


Aug. 31, 2022

The purpose of the Certified Kubernetes Administrator (CKA) program is to provide assurance that CKAs have the skills, knowledge, and competency to perform the responsibilities of Kubernetes administrators.
Manage role based access control (RBAC)
Use Kubeadm to install a basic cluster
Manage a highly-available Kubernetes cluster
Provision underlying infrastructure to deploy a Kubernetes cluster
Perform a version upgrade on a Kubernetes cluster using Kubeadm
Implement etcd backup and restore
Understand deployments and how to perform rolling update and rollbacks
Use ConfigMaps and Secrets to configure applications
Know how to scale applications
Understand the primitives used to create robust, self-healing, application deployments
Understand how resource limits can affect Pod scheduling
Awareness of manifest management and common templating tools
Understand host networking configuration on the cluster nodes
Understand connectivity between Pods
Understand ClusterIP, NodePort, LoadBalancer service types and endpoints
Know how to use Ingress controllers and Ingress resources
Know how to configure and use CoreDNS
Choose an appropriate container network interface plugin
Understand storage classes, persistent volumes
Understand volume mode, access modes and reclaim policies for volumes
Understand persistent volume claims primitive
Know how to configure applications with persistent storage
Evaluate cluster and node logging
Understand how to monitor applications
Manage container stdout & stderr logs
Troubleshoot application failure
Troubleshoot cluster component failure
Troubleshoot networking

The control plane's components make global decisions about the cluster (for example, scheduling), as well as detecting and responding to cluster events (for example, starting up a new pod when a Deployment's replicas field is unsatisfied).
Control plane components can be run on any machine in the cluster. However, for simplicity, setup scripts typically start all control plane components on the same machine, and do not run user containers on this machine. See Creating Highly Available clusters with kubeadm for an example control plane setup that runs across multiple machines.
The API server is a component of the Kubernetes control plane that exposes the Kubernetes API. The API server is the front end for the Kubernetes control plane.
The main implementation of a Kubernetes API server is kube-apiserver. kube-apiserver is designed to scale horizontally—that is, it scales by deploying more instances. You can run several instances of kube-apiserver and balance traffic between those instances.
Consistent and highly-available key value store used as Kubernetes' backing store for all cluster data.
If your Kubernetes cluster uses etcd as its backing store, make sure you have a back up plan for the data.
You can find in-depth information about etcd in the official documentation.
Control plane component that watches for newly created Pods with no assigned node, and selects a node for them to run on.
Factors taken into account for scheduling decisions include: individual and collective resource requirements, hardware/software/policy constraints, affinity and anti-affinity specifications, data locality, inter-workload interference, and deadlines.
Control plane component that runs controller processes.
Logically, each controller is a separate process, but to reduce complexity, they are all compiled into a single binary and run in a single process.
There are many different types of controllers. Some examples of them are:
The above is not an exhaustive list.
A Kubernetes control plane component that embeds cloud-specific control logic. The cloud controller manager lets you link your cluster into your cloud provider's API, and separates out the components that interact with that cloud platform from components that only interact with your cluster.
The cloud-controller-manager only runs controllers that are specific to your cloud provider. If you are running Kubernetes on your own premises, or in a learning environment inside your own PC, the cluster does not have a cloud controller manager.
As with the kube-controller-manager, the cloud-controller-manager combines several logically independent control loops into a single binary that you run as a single process. You can scale horizontally (run more than one copy) to improve performance or to help tolerate failures.
The following controllers can have cloud provider dependencies:
Node components run on every node, maintaining running pods and providing the Kubernetes runtime environment.
An agent that runs on each node in the cluster. It makes sure that containers are running in a Pod.
The kubelet takes a set of PodSpecs that are provided through various mechanisms and ensures that the containers described in those PodSpecs are running and healthy. The kubelet doesn't manage containers which were not created by Kubernetes.
kube-proxy is a network proxy that runs on each node in your cluster, implementing part of the Kubernetes Service concept.
kube-proxy maintains network rules on nodes. These network rules allow network communication to your Pods from network sessions inside or outside of your cluster.
kube-proxy uses the operating system packet filtering layer if there is one and it's available. Otherwise, kube-proxy forwards the traffic itself.
A fundamental component that empowers Kubernetes to run containers effectively. It is responsible for managing the execution and lifecycle of containers within the Kubernetes environment.
Kubernetes supports container runtimes such as containerd, CRI-O, and any other implementation of the Kubernetes CRI (Container Runtime Interface).
Addons use Kubernetes resources (DaemonSet, Deployment, etc) to implement cluster features. Because these are providing cluster-level features, namespaced resources for addons belong within the kube-system namespace.
Selected addons are described below; for an extended list of available addons, please see Addons.
While the other addons are not strictly required, all Kubernetes clusters should have cluster DNS, as many examples rely on it.
Cluster DNS is a DNS server, in addition to the other DNS server(s) in your environment, which serves DNS records for Kubernetes services.
Containers started by Kubernetes automatically include this DNS server in their DNS searches.
Dashboard is a general purpose, web-based UI for Kubernetes clusters. It allows users to manage and troubleshoot applications running in the cluster, as well as the cluster itself.
Container Resource Monitoring records generic time-series metrics about containers in a central database, and provides a UI for browsing that data.
A cluster-level logging mechanism is responsible for saving container logs to a central log store with search/browsing interface.
Network plugins are software components that implement the container network interface (CNI) specification. They are responsible for allocating IP addresses to pods and enabling them to communicate with each other within the cluster.
The Lab Environment
The following Labs were run on a 3-node cluster deployed with kubeadm (1 master node and 2 worker nodes running Kubernetes v1.15.1 and kubectl 1.15.1). To get started you will first deploy a 3-node cluster and then use the cluster for subsequent labs.
Lab Index
Login to all the IP addresses given to you
Run the following commands in a terminal
chmod 600 /path/to/labkey
ssh -i /path/to/labkey root@<server IP>
Open Putty and configure a new session. Expand “ConnectionSSHAuth and then specify the PPK file. Now save your session.
First, in order to ensure the downloads are valid, add the GPG key for the official Docker repository to your system:
curl -fsSL https://download.docker.com/linux/ubuntu/gpg | sudo apt-key add -
Add the Docker repository to APT sources:
sudo add-apt-repository "deb [arch=amd64] https://download.docker.com/linux/ubuntu $(lsb_release -cs) stable"
Next, update the package database with the Docker packages from the newly added repo:
sudo apt-get update
sudo apt-get install -y docker-ce
sudo systemctl status docker
sudo iptables --flush
Test Docker: Make sure docker is properly installed before moving to the second stage to install Kubernetes
docker ps
docker run hello-world
docker images
Following commands must be run as the root user.
Install packages required for Kubernetes on all servers as the root user
apt-get update && apt-get install -y apt-transport-https
curl -s https://packages.cloud.google.com/apt/doc/apt-key.gpg | apt-key add -
Create Kubernetes repository by running the following as one command.
cat <<EOF >/etc/apt/sources.list.d/kubernetes.list
deb http://apt.kubernetes.io/ kubernetes-xenial main
EOF
Now that you've added the repository install the packages
sudo apt-key adv --keyserver keyserver.ubuntu.com --recv-keys 6A030B21BA07F4FB
apt-get update
apt-get install -y kubelet kubeadm kubectl
The kubelet is now restarting every few seconds, as it waits in a crashloop for kubeadm to tell it what to do.
Run the following command on the master node to initialize
kubeadm init --ignore-preflight-errors all
If everything was successful the output will contain
Your Kubernetes master has initialized successfully!
Note the kubeadm join... command, it will be needed later on.
Now configure server so you can interact with Kubernetes as the unprivileged user.
mkdir -p $HOME/.kube
sudo cp -i /etc/kubernetes/admin.conf $HOME/.kube/config
sudo chown $(id -u):$(id -g) $HOME/.kube/config
Run following on the master to enable IP forwarding to IPTables.
sudo sysctl net.bridge.bridge-nf-call-iptables=1
Install a Pod network on the master node
export kubever=$(kubectl version | base64 | tr -d '\n')
kubectl apply -f "https://cloud.weave.works/k8s/net?k8s-version=$kubever"
Wait until coredns pod is in a running state
kubectl get pods -n kube-system
Log into each of the worker nodes and run the join command from kubeadm init master output.
sudo kubeadm join --token <token> <IP>:6443 --discovery-token-ca-cert-hash <hash>
To confirm nodes have joined successfully log back into master and run
watch kubectl get nodes
When they are in a Ready state the cluster is online and nodes have been joined. Congrats!
Verifying Install
kubectl version
You should get output similar to the following:
Client Version: version.Info{Major:"1", Minor:"15", GitVersion:"v1.15.1", GitCommit:"4485c6f18cee9a5d3c3b4e523bd27972b1b53892", GitTreeState:"clean", BuildDate:"2019-07-18T14:25:20Z", GoVersion:"go1.12.7", Compiler:"gc", Platform:"darwin/amd64"}
Server Version: version.Info{Major:"1", Minor:"15", GitVersion:"v1.15.1", GitCommit:"4485c6f18cee9a5d3c3b4e523bd27972b1b53892", GitTreeState:"clean", BuildDate:"2019-07-18T09:09:21Z", GoVersion:"go1.12.5", Compiler:"gc", Platform:"linux/amd64"}
kubectl is the Kubernetes client used primaryly for interacting with a Kubernetes cluster. . You must familiarise yourself with kubectl
Here is the lab outline:
kubectl <command> <type> <name> <flags>
Examples to Illustrate the syntax
1. First let's create a pod and name it 'mypod'
$ kubectl run mypod --image=nginx
2. Let's see the pod by listing all the running pods in the default namespace
$ kubectl get pods
3. Let's see the specific pod we just created by specifying the pod name
$ kubectl get pod mypod
4. Let's delete the pod when done
$ kubectl delete pod mypod
Context and kubeconfig
Kubectl allows a user to interact with and manage multiple Kubernetes clusters. To do this, it requires what is known as a context. A context consists of a combination of cluster, namespace and user.
These contexts are stored in a local yaml based config file referred to as the kubeconfig. For unix based systems, the kubeconfig is stored in $HOME/.kube/config
This config is viewable without having to view the file directly.
$ kubectl config view
Output:
apiVersion: v1
clusters:
- cluster:
    certificate-authority-data: DATA+OMITTED
    server: https://172.16.75.128:6443
  name: kubernetes
contexts:
- context:
    cluster: kubernetes
    user: kubernetes-admin
  name: kubernetes-admin@kubernetes
current-context: kubernetes-admin@kubernetes
kind: Config
preferences: {}
users:
- name: kubernetes-admin
  user:
    client-certificate-data: DATA+OMITTED
    client-key-data: DATA+OMITTED


kubectl config
Managing all aspects of contexts is done via the kubectl config command.
To see all the command line options type:
$kubectl config
Some examples include:
Lab: Using Contexts
Objective: Create a new context called minidev and switch to it. This is just to illustrate switching between contexts. Typically, there are more steps to create a context but here we are just reusing existsing user called 'kubernetes-admin'
$ kubectl config get-contexts
$ kubectl config set-context minidev --cluster=kubernetes --user=kubernetes-admin --namespace=dev
$kubectl config get-contexts
$ kubectl config use-context minidev
$ kubectl config current-context
$kubectl config use-context kubernetes-admin@kubernetes
Summary: Understanding and being able to switch between contexts is a base fundamental skill required by every Kubernetes user. As more clusters and namespaces are added, this can become unwieldy. Installing a helper application such as kubectx can be quite helpful. Kubectx allows a user to quickly switch between contexts and namespaces without having to use the full kubectl config use-context command.
Lab: Install kubectx and kubens
To install both kubectx and kubens we use snapd utility. Snapd may already be installed but let's make sure we have it installed by running the commands:
$ sudo apt update
$ sudo apt install snapd
With snapd enabled, we can now install kubectx and kubens by running the commands:
$sudo snap install kubectx --classic
Now that we have them installed, we can use them handy:
Some examples:
$ kubens
OutPut:
default
kube-node-lease
kube-public
kube-system
To switch to the default namespace use:
$kubens deault
To list the current contexts use:
$kubectx
kubernetes-admin@kubernetes
minidev
To switch to a context use:
$kubectx kubernetes-admin@kubernetes
There are several kubectl commands that are frequently used for day-to-day operations. examples include get, create, apply, delete, describe, and logs. Other commands can be listed simply with kubectl --help, or kubectl <command> --help.
Let's disscuss the commands:
kubectl get
kubectl get fetches and lists objects of a certain type or a specific object itself. It also supports outputting the information in several different useful formats including: json, yaml, wide (additional columns), or name (names only) via the -o or –output flag.
Command
kubectl get <type>
kubectl get <type> <name>
kubectl get <type> <name> -o <output format>
Examples
$ kubectl get namespaces
NAME STATUS AGE
default           Active   4h10m
kube-node-lease   Active   4h10m
kube-public       Active   4h10m
kube-system       Active   4h10m
$kubectl get pod -o wide
NAME READY STATUS RESTARTS AGE IP NODE NOMINATED NODE READINESS GATES
mypod 1/1 Running 0 9s 10.0.2.54 node02 <none> <none>
kubectl create
kubectl create creates an object from the commandline (stdin) or a supplied json/yaml manifest.
The manifests can be specified with the -f or –-ilename flag that can point to either a file, or a directory containing multiple manifests.
Command
Examples
$ kubectl create namespace dev
namespace "dev" created
$ kubectl create -f manifests/mypod.yaml
pod "mypod" created
kubectl apply
kubectl apply is similar to kubectl create. It will essentially update the resource if it is already created, or simply create it if does not yet exist. When it updates the config, it will save the previous version of it in an annotation on the created object itself. WARNING: If the object was not created initially with kubectl apply it's updating behavior will act as a two-way diff.
Just like kubectl create it takes a json or yaml manifest with the -f flag or accepts input from stdin.
Command
kubectl apply -f <path to manifest>
Examples
$ kubectl apply -f manifests/mypod.yaml
Warning: kubectl apply should be used on resource created by either kubectl create --save-config or kubectl apply
pod "mypod" configured
kubectl edit
kubectl edit modifies a resource in place without having to apply an updated manifest. It fetches a copy of the desired object and opens it locally with the configured text editor, set by the KUBE_EDITOR or EDITOR Environment Variables. This command is useful for troubleshooting, but should be avoided in production scenarios as the changes will essentially be untracked.
Command
$ kubectl edit <type> <object name>
Examples
kubectl edit pod mypod
kubectl edit service myservice
kubectl describe
kubectl describe lists detailed information about the specific Kubernetes object. It is a very helpful troubleshooting tool.
Command
kubectl describe <type>
kubectl describe <type> <name>
Examples
kubectl describe pod mypod
kubectl describe pod mypod
Name:             mypod
Namespace:        default
Priority:         0
Service Account:  default
Node:             node01/192.168.201.11
Start Time:       Tue, 02 Jul 2024 20:57:03 +0000
Labels:           run=mypod
Annotations:      <none>
Status:           Running
IP:               10.0.1.127
IPs:
  IP:  10.0.1.127
Containers:
  mypod:
    Container ID:   containerd://36a2919fe96f516cc9cdee76d5518cbe11dd944d1f09d3e985f77f7da1b9a37c
    Image:          nginx
    Image ID:       docker.io/library/nginx@sha256:b31263533dda53e7d9762dce38da81452ec0a959a1f714859466bc4c5e9cbbae
    Port:           <none>
    Host Port:      <none>
    State:          Running
      Started:      Tue, 02 Jul 2024 20:57:09 +0000
    Ready:          True
    Restart Count:  0
    Environment:    <none>
    Mounts:
      /var/run/secrets/kubernetes.io/serviceaccount from kube-api-access-fpm9k (ro)
kubectl logs
kubectl logs outputs the combined stdout and stderr logs from a pod. If more than one container exist in a pod the -c flag is used and the container name must be specified.
Command
kubectl logs <pod name>
kubectl logs <pod name> -c <container name>
Examples
$ kubectl logs mypod
172.17.0.1 - - [10/Mar/2018:18:14:15 +0000] "GET / HTTP/1.1" 200 612 "-" "curl/7.57.0" "-"
172.17.0.1 - - [10/Mar/2018:18:14:17 +0000] "GET / HTTP/1.1" 200 612 "-" "curl/7.57.0" "-"
kubectl delete
deletes the object from Kubernetes.
Command
kubectl delete <type> <name>
Examples
$ kubectl delete pod mypod
pod "mypod" deleted
LAB: The Basics
Objective: Explore the basics.. Here you will practice and learn the following:
kubectl create namespace dev
apiVersion: v1
kind: Pod
metadata:
  name: nginx
spec:
  containers:
  - name: nginx
    image: nginx:1.14.2
    ports:
    - containerPort: 80
Then create it with:
kubectl apply -f mypod.yaml
kubectl get pod mypod -o yaml
kubectl describe pod mypod
kubectl delete pod mypod
Accessing the Cluster
Kubectl provides several mechanisms for accessing resources within the cluster remotely. For this lab, the focus will be on using kubectl exec to get a remote shell within a container, and kubectl proxy to gain access to the services exposed through the API proxy.
kubectl exec
kubectl exec executes a command within a Pod and can optionally spawn an interactive terminal within a remote container. When more than one container is present within a Pod, the -c or –container flag is required, followed by the container name.
If an interactive session is desired, the -i (--stdin) and -t(--tty) flags must be supplied.
Command
kubectl exec <pod name> -- <arg>
kubectl exec <pod name> -c <container name> -- <arg>
kubectl exec -i -t <pod name> -c <container name> -- <arg>
kubectl exec -it <pod name> -c <container name> -- <arg>
Example
$kubectl exec mypod -c mypod -- printenv
PATH=/usr/local/sbin:/usr/local/bin:/usr/sbin:/usr/bin:/sbin:/bin
HOSTNAME=mypod
NGINX_VERSION=1.27.0
NJS_VERSION=0.8.4
NJS_RELEASE=2~bookworm
PKG_RELEASE=2~bookworm
KUBERNETES_SERVICE_HOST=10.96.0.1
KUBERNETES_SERVICE_PORT=443
KUBERNETES_SERVICE_PORT_HTTPS=443
KUBERNETES_PORT=tcp://10.96.0.1:443
KUBERNETES_PORT_443_TCP=tcp://10.96.0.1:443
KUBERNETES_PORT_443_TCP_PROTO=tcp
KUBERNETES_PORT_443_TCP_PORT=443
KUBERNETES_PORT_443_TCP_ADDR=10.96.0.1
HOME=/root
$ kubectl exec -i -t mypod -c mypod -- /bin/sh
root@mypod:/#
root@mypod:/#exit
LAB: Executing Commands within a Remote Pod
Objective: Use kubectl exec to both initiate commands and spawn an interactive shell within a Pod.
$ kubectl create -f manifests/mypod.yaml
$ kubectl get pods --watch
$ kubectl exec mypod -- cat /etc/os-release
PRETTY_NAME="Debian GNU/Linux 12 (bookworm)"
NAME="Debian GNU/Linux"
VERSION_ID="12"
VERSION="12 (bookworm)"
VERSION_CODENAME=bookworm
ID=debian
HOME_URL="https://www.debian.org/"
SUPPORT_URL="https://www.debian.org/support"
BUG_REPORT_URL="https://bugs.debian.org/"
It should output the contents of the os-release file.
$ kubectl exec -i -t mypod -- /bin/sh
#
If executed correctly, it should drop you into a new shell session within the nginx container.
# ls
There should be two nginx processes along with a /bin/sh process representing your interactive shell.
Summary: kubectl exec is not often used, but is an important skill to be familiar with when it comes to Pod debugging.
kubectl proxy
kubectl proxy enables access to both the Kubernetes API-Server and to resources running within the cluster securely using kubectl. By default it creates a connection to the API-Server that can be accessed at 127.0.0.1:8001 or an alternative port by supplying the -p or –port flag.
Command
kubectl proxy
kubectl proxy --port=<port>
Examples
$ kubectl proxy
Starting to serve on 127.0.0.1:8001
Do the following from another terminal since this terminal is now engaged. Alternatively, you can run the above command in the background by placing $ at the end, like 'kubectl proxy &' and then run the following commands from the same shell.
$ curl 127.0.0.1:8001/version
{
  "major": "1",
  "minor": "29",
  "gitVersion": "v1.29.6",
  "gitCommit": "062798d53d83265b9e05f14d85198f74362adaca",
  "gitTreeState": "clean",
  "buildDate": "2024-06-11T20:17:07Z",
  "goVersion": "go1.21.11",
  "compiler": "gc",
  "platform": "linux/arm64"
}
The Kubernetes API-Server has the built in capability to proxy to running services or pods within the cluster. This ability in conjunction with the kubectl proxy command allows a user to access those services or pods without having to expose them outside of the cluster.
http://<proxy_address>/api/v1/namespaces/<namespace>/<services|pod>/<service_name|pod_name>[:port_name]/proxy
Example
This will access nginx server
curl http://127.0.0.1:8001/api/v1/namespaces/default/pods/mypod/proxy/
This will access the kubernetes-dashboard if it were deployed:
curl http://127.0.0.1:8001/api/v1/namespaces/kube-system/services/kubernetes-dashboard/proxy/
When done, you can kill the proxy by pressing ctrl+c
Remember to cleanup any resources you have might have created above like the pod.
Congratulations!! You have gone through the most important aspects of using the kubectl command but more may follow as the course progresses.
Namespaces
Namespaces are a logical cluster or environment. They are the primary method of partitioning a cluster or scoping access. Namespaces function as the primary method of providing scoped names, access, and act as an umbrella for group based resource restriction. Creating and switching between them is quick and easy, but very important. Remember that you can use kubens to switch between nemaspaces.
Exercise: Using Namespaces
$ kubectl get namespaces
$ kubectl create namespace dev
3. create a pod object in the dev namespace
$ kubectl run pod1 --image=nginx --namespace dev
4. List the object in the dev namespace
$kubectl get pods -n dev
Pods
A pod is the atomic unit of Kubernetes. It is the smallest “unit of work” or “management resource” within the system and is the foundational building block of all Kubernetes Workloads. Becoming familiar with creating and viewing the general aspects of a Pod is an important skill though it is rare that one would manage Pods directly within Kubernetes. Pods are best managed using a contoller object like the Deployment object.
Note: These exercises build off the previous Core labs. If you have not done so, complete those before continuing.
LAB: Creating Pods
manifests/pod-example.yaml
apiVersion: v1
kind: Pod
metadata:
name: pod-example
spec:
containers:
- name: nginx
image: nginx:stable-alpine
ports:
- containerPort: 80
$ kubectl create -f manifests/pod-example.yaml
$ kubectl describe pod pod-example
$ kubectl proxy &
$ curl http://127.0.0.1:8001/api/v1/namespaces/default/pods/pod-example/proxy/
The default "Welcome to nginx!" page should be visible.
Or
$kubectl get pods -o wide
NAME READY STATUS RESTARTS AGE IP NODE NOMINATED NODE READINESS GATES
mypod 1/1 Running 0 124m 10.0.1.127 node01 <none> <none>
$ curl 10.0.1.127
<!DOCTYPE html>
<html>
<head>
<title>Welcome to nginx!</title>
<style>
html { color-scheme: light dark; }
body { width: 35em; margin: 0 auto;
font-family: Tahoma, Verdana, Arial, sans-serif; }
</style>
</head>
<body>
<h1>Welcome to nginx!</h1>
<p>If you see this page, the nginx web server is successfully installed and
working. Further configuration is required.</p>
<p>For online documentation and support please refer to
<a href="http://nginx.org/">nginx.org</a>.<br/>
Commercial support is available at
<a href="http://nginx.com/">nginx.com</a>.</p>
<p><em>Thank you for using nginx.</em></p>
</body>
</html>
manifests/pod-multi-container-example.yaml
apiVersion: v1
kind: Pod
metadata:
  name: multi-container-example
spec:
  containers:
  - name: nginx
    image: nginx:stable-alpine
    ports:
    - containerPort: 80
    volumeMounts:
    - name: html
      mountPath: /usr/share/nginx/html
  - name: content
    image: alpine:latest
    volumeMounts:
    - name: html
      mountPath: /html
    command: ["/bin/sh", "-c"]
    args:
      - while true; do
          echo $(date)"<br />" >> /html/index.html;
          sleep 5;
        done
  volumes:
  - name: html
    emptyDir: {}
$ kubectl create -f manifests/pod-multi-container-example.yaml
Note: spec.containers is an array allowing you to use multiple containers within a Pod.
$ kubectl proxy &
$curl http://127.0.0.1:8001/api/v1/namespaces/default/pods/multi-container-example/proxy/
There should be a repeating date-time-stamp.
Labels and Selectors
Labels are key-value pairs that are used to identify, describe and group together related sets of objects or resources.
Selectors use labels to filter or select objects and are used throughout Kubernetes.
Kubernetes makes heavy use of labels and selectors.
LAB: Using Labels and Selectors: Explore the methods of labelling objects in addition to filtering them with both equality and set-based selectors.
$ kubectl label pod pod-example app=nginx environment=dev
$ kubectl get pods --show-labels
manifests/pod-multi-container-example.yaml
apiVersion: v1
kind: Pod
metadata:
  name: multi-container-example
  labels:
    app: nginx
    environment: prod
spec:
  containers:
  - name: nginx
    image: nginx:stable-alpine
    ports:
    - containerPort: 80
    volumeMounts:
    - name: html
      mountPath: /usr/share/nginx/html
  - name: content
    image: alpine:latest
    volumeMounts:
    - name: html
      mountPath: /html
    command: ["/bin/sh", "-c"]
    args:
      - while true; do
          date >> /html/index.html;
          sleep 5;
        done
  volumes:
  - name: html
    emptyDir: {}
$ kubectl apply -f manifests/pod-multi-container-example.yaml
$ kubectl get pods --show-labels
$ kubectl get pods --selector environment=prod
$ kubectl get pods -l app=nginx
$ kubectl get pods -l 'app in (nginx), environment notin (prod)'
$kubectl get pods -l 'app in (nginx), environment in (prod)'
Workloads within Kubernetes are higher level objects that manage Pods or other higher-level objects.
In ALL CASES a Pod Template is included, and acts as the base tier of management.
Note:
Unlike some of the other labs, the workload exercises should be cleaned up before moving onto the next workload type. The clean-up commands will be included after Summary section of the exercise.
ReplicaSets
ReplicaSets are the primary method of managing Pod replicas and their lifecycle. This includes their scheduling, scaling, and deletion.
Their job is simple, always ensure the desired number of replicas that match the selector are running.
LAB: In this lab you will:
manifests/rs-example.yaml
apiVersion: apps/v1
kind: ReplicaSet
metadata:
  labels:
    app: rs-example
  name: rs-example
spec:
  replicas: 1
  selector:
    matchLabels:
      app: nginx
      env: prod
  template:
    metadata:
      labels:
        app: nginx
        env: prod
    spec:
      containers:
      - image: nginx:stable-alpine
        name: nginx
        ports:
        - containerPort: 80
Command
$ kubectl create -f manifests/rs-example.yaml
$ kubectl get pods --watch --show-labels
Note that the newly provisioned Pods are given a name based off the ReplicaSet name appended with a 5 character random string. These Pods are labeled with the labels as specified in the manifest.
$ kubectl scale replicaset rs-example --replicas=5
Tip: replicaset can be substituted with rs when using kubectl.
$ kubectl describe rs rs-example
$ kubectl scale rs rs-example --replicas=3
$ kubectl get pods --show-labels --watch
manifests/pod-rs-example.yaml
apiVersion: v1
kind: Pod
metadata:
labels:
app: nginx
env: prod
name: pod-example
spec:
containers:
- image: nginx:stable-alpine
name: nginx
ports:
- containerPort: 80
$ kubectl create -f manifests/pod-rs-example.yaml
$ kubectl get pods --show-labels --watch
Note that the Pod is created and immediately terminated.
$ kubectl describe rs rs-example
There will be an entry with Deleted pod: pod-example towards the end of tyhe Events Section. This is because a ReplicaSet targets ALL Pods matching the labels supplied in the selector.
Clean Up:
kubectl delete rs rs-example
Deployments
Deployments are a declarative method of managing Pods via ReplicaSets. They provide rollback functionality in addition to more granular update control mechanisms.
LAB: Using Deployments
manifests/deployment-example.yaml
apiVersion: apps/v1
kind: Deployment
metadata:
labels:
app: deploy-example
name: deploy-example
spec:
replicas: 3
selector:
matchLabels:
app: nginx
template:
metadata:
labels:
app: nginx
spec:
containers:
- image: nginx:stable-alpine
name: nginx
ports:
- containerPort: 80
Command
$ kubectl create -f manifests/deploy-example.yaml --record
$ kubectl get deployments
$ kubectl get rs --show-labels
Note the name and pod-template-hash label of the newly created ReplicaSet. The created ReplicaSet's name will include the pod-template-hash. For example deploy-example-598bb489bf
$ kubectl describe rs deploy-example-598bb489bf
$ kubectl get pods --show-labels
Just as with the ReplicaSet, the Pods name and labels include the pod-template-hash.
$ kubectl describe pod deploy-example-<pod-template-hash-<random>
For example:
$ kubectl describe pod deploy-example-598bb489bf-8fpft
Look at the Controlled By field. It will contain a reference to the parent ReplicaSet, but not the parent Deployment.
Updating Deployments:
Now that the relationship from Deployment to ReplicaSet to Pod is understood. It is time to update the deploy-example and see an update in action.
$ kubectl apply -f manifests/deploy-example.yaml
< or >
$ kubectl edit deploy deploy-example
Tip: deploy can be substituted for deployment when using kubectl.
2. Immediately watch the Pods.
$ kubectl get pods --show-labels --watch
The old version of the Pods will be phased out one at a time and instances of the new version will take its place. The way in which this is controlled is through the strategy stanza. For specific documentation this feature, see the Deployment Strategy Documentation.
3. Now view the ReplicaSets.
$ kubectl get rs --show-labels
There will now be two ReplicaSets, with the previous version of the Deployment being scaled down to 0.
Scaling a Deployment
4. Now, scale the Deployment up as you would a ReplicaSet, and set the replicas=5.
$ kubectl scale deploy deploy-example --replicas=5
5. List the ReplicaSets.
$ kubectl get rs --show-labels
Note that there is NO new ReplicaSet generated. Scaling actions do NOT trigger a change in the Pod Template.
6. Just as before, describe the Deployment, ReplicaSet and one of the Pods. Note the Events and Controlled By fields. It should present a clear picture of relationship between objects during an update of a Deployment.
$ kubectl describe deploy deploy-example
$ kubectl describe rs deploy-example-<pod-template-hash>
$ kubectl describe pod deploy-example-<pod-template-hash-<random>
Summary:
LAB: Rolling Back a Deployment
Objective: Learn how to view the history of a Deployment and rollback to older revisions.
Note: This exercise builds off the previous exercise: Using Deployments. If you have not, complete it first before continuing.
$ kubectl rollout history deployment deploy-example
There should be two revisions. One for when the Deployment was first created, and another when the additional Labels were added. The number of revisions saved is based off of the revisionHistoryLimit attribute in the Deployment spec.
$ kubectl rollout history deployment deploy-example --revision=1
$ kubectl rollout history deployment deploy-example --revision=2
Viewing the specific revision will display a summary of the Pod Template.
$ kubectl rollout undo deployment deploy-example --to-revision=1
Tip: The –to-revision flag can be omitted if you wish to just go back to the previous configuration.
$ kubectl get pods --show-labels --watch
They will cycle through rolling back to the previous revision.
$ kubectl describe deployment deploy-example
The events will describe the scaling back of the previous and switching over to the desired revision.
Summary: Understanding how to use rollout command to both get a diff of the different revisions as well as be able to roll-back to a previously known good configuration is an important aspect of Deployments that cannot be left out.
Clean Up Command
$kubectl delete deploy deploy-example
DaemonSets
DaemonSets ensure that all nodes matching certain criteria will run an instance of the supplied Pod. They bypass default scheduling mechanisms and restrictions, and are ideal for cluster wide services such as log forwarding, or health monitoring.
LAB: Managing DaemonSets
Objective: Experience creating, updating, and rolling back a DaemonSet. Additionally delve into the process of how they are scheduled and how an update occurs.
manifests/ds-example.yaml
apiVersion: apps/v1
kind: DaemonSet
metadata:
labels:
app: ds-example
name: ds-example
spec:
selector:
matchLabels:
app: nginx
env: prod
template:
metadata:
labels:
app: nginx
env: prod
spec:
containers:
- image: nginx:stable-alpine
name: nginx
ports:
- containerPort: 80
$ kubectl create -f manifests/ds-example.yaml
$ kubectl get daemonset
It will create a pod on each of your nodes but be patient as it often takes time to create the pods on each of the cluster nodes. You can also use node labels to specify the nodes where you want a pod to run. We will talk more about scheduling in another section but here is an example.
apiVersion: apps/v1
kind: DaemonSet
metadata:
labels:
app: ds-example
name: ds-example
spec:
selector:
matchLabels:
app: nginx
env: prod
template:
metadata:
labels:
app: nginx
env: prod
spec:
nodeSelector:
nodeType: edge
containers:
- image: nginx:stable-alpine
name: nginx
ports:
- containerPort: 80
$ kubectl delete -f manifests/ds-example.yaml
$ kubectl create -f manifests/ds-example.yaml
3. View the current DaemonSets.
$ kubectl get daemonset
As there are no matching nodes, no Pods should be scheduled.
4. Label node node1 with nodeType=edge
$ kubectl label node node01 nodeType=edge
5. View the current DaemonSets once again.
$ kubectl get daemonsets
There should now be a single instance of the DaemonSet ds-example deployed.
6. View the current Pods and display their labels with --show-labels.
$ kubectl get pods --show-labels
Note that the deployed Pod has a controller-revision-hash label. This is used like the pod-template-hash in a Deployment to track and allow for rollback functionality.
7. Describing the DaemonSet will provide you with status information regarding its Deployment cluster wide.
$ kubectl describe ds ds-example
Tip: ds can be substituted for daemonset when using kubectl.
Summary: DaemonSets are usually used for important cluster-wide support services such as Pod Networking, Logging, or Monitoring. They differ from other workloads in that their scheduling bypasses normal mechanisms, and is centered around node placement. Like Deployments, they have their own pod-template-hash in the form of controller-revision-hash used for keeping track of Pod Template revisions and enabling rollback functionality.
Clean Up
kubectl delete ds ds-example
Jobs and CronJobs
The Job Controller ensures one or more Pods are executed and successfully terminate. Essentially a task executor that can be run in parallel.
CronJobs are an extension of the Job Controller, and enable Jobs to be run on a schedule.
Exercise: Creating a Job
Objective: Create a Kubernetes Job and work to understand how the Pods are managed with completions and parallelism directives.
manifests/job-example.yaml
apiVersion: batch/v1
kind: Job
metadata:
name: job-example
spec:
backoffLimit: 4
completions: 4
parallelism: 2
template:
spec:
containers:
- name: hello
image: alpine:latest
command: ["/bin/sh", "-c"]
args: ["echo hello from $HOSTNAME!"]
restartPolicy: Never
Command
$ kubectl create -f manifests/job-example.yaml
$ kubectl get pods --show-labels --watch
Only two Pods are being provisioned at a time; adhering to the parallelism attribute. This is done until the total number of completions is satisfied. Additionally, the Pods are labeled with controller-uid, this acts as a unique ID for that specific Job.
When done, the Pods persist in a Completed state. They are not deleted after the Job is completed or failed. This is intentional to better support troubleshooting.
$ kubectl describe job job-example
$ kubectl delete job job-example
$ kubectl get pods
The Pods will now be deleted. They are cleaned up when the Job itself is removed.
Summary: Jobs are fire and forget one off tasks, batch processing or as an executor for a workflow engine. They "run to completion" or terminate gracefully adhering to the completions and parallelism directives.
Exercise: Scheduling a CronJob
Objective: Create a CronJob based off a Job Template. Understand how the Jobs are generated and how to suspend a job in the event of a problem.
manifests/cronjob-example.yaml
apiVersion: batch/v1
kind: CronJob
metadata:
name: cronjob-example
spec:
schedule: "*/1 * * * *"
successfulJobsHistoryLimit: 2
failedJobsHistoryLimit: 1
jobTemplate:
spec:
completions: 4
parallelism: 2
template:
spec:
containers:
- name: hello
image: alpine:latest
command: ["/bin/sh", "-c"]
args: ["echo hello from $HOSTNAME!"]
restartPolicy: Never
$ kubectl create -f manifests/cronjob-example.yaml
$ kubectl get jobs
There should be at least one Job named in the format <cronjob-name>-<unix time stamp>. Note the timestamp of the oldest Job.
$ kubectl get jobs
The oldest Job should have been removed. The CronJob controller will purge Jobs according to the ‘successfulJobHistoryLimit’ and ‘failedJobHistoryLimit’ attributes. In this case, it is retaining strictly the last 3 successful Jobs.
$ kubectl describe CronJob cronjob-example
The events will show the records of the creation and deletion of the Jobs.
$ kubectl edit CronJob cronjob-example
This will prevent the cronjob from firing off any future events, and is useful to do to initially troubleshoot an issue without having to delete the CronJob directly.
$ kubectl delete cronjob cronjob-example
Deleting the CronJob WILL delete all child Jobs. Use Suspend to stop the Job temporarily if attempting to troubleshoot.
Summary: CronJobs are a useful extension of Jobs. They are great for backup or other day-to-day tasks, with the only caveat being they adhere to a UTC ONLY schedule.
Clean Up Commands
kubectl delete CronJob cronjob-example
Helpful Resources
Kubernetes Networking Labs
The Lab Environment
The following Labs were run on a 3-node cluster deployed with kubeadm (1 master node and 2 worker nodes running Kubernetes). To get started you will first deploy a 3-node cluster and then use the cluster for subsequent labs.
Lab Index
The Kubernetes service object are the unified method of accessing the exposed workloads of Pods. They are a durable resource (unlike Pods) that is given a static cluster-unique IP and provide simple load-balancing through kube-proxy.
Note: These exercises build off the previous Core labs. If you have not done so, complete those before continuing.
LAB: The clusterIP Service
Objective: Create a ClusterIP service and view the different ways it is accessible within the cluster.
manifests/service-clusterip.yaml
apiVersion: v1
kind: Pod
metadata:
name: mypod
labels:
app: nginx
spec:
containers:
- name: nginx
image: nginx:stable-alpine
ports:
- containerPort: 80
$ kubectl create -f manifests/mypod.yaml
manifests/service-clusterip.yaml
apiVersion: v1
kind: Service
metadata:
labels:
app: nginx
name: mypod
spec:
ports:
- port: 80
protocol: TCP
targetPort: 80
selector:
app: nginx
You may also use the command below to generate the file
kubectl expose pod mypod --port=80 --target-port=80 --dry-run=client -o yaml >svc-clusterip.yaml
$ kubectl create -f manifests/service-clusterip.yaml
$ kubectl describe service mypod
Command
$ kubectl proxy &
Display the API endpoints with the following command. The list will be long but here trunkated.
curl localhost:8001
{
"paths": [
"/api",
"/api/v1",
"/apis",
"/apis/",
...
You can view mypod service with this command. This will show you the ngnx default page running.
curl http://127.0.0.1:8001/api/v1/namespaces/default/services/mypod/proxy/
Alternatively, to access the clusterIP on the localhost, you can do port-forwarding. Ensure that port 80 on the localhost is not currently used.
kubectl port-forward service/mypod 80:80
curl http://127.0.0.1
$ kubectl exec mypod -- nslookup mypod.default.svc.cluster.local
Server: 10.96.0.10
Address: 10.96.0.10:53
Name: mypod.default.svc.cluster.local
Address: 10.111.9.205
The output, shown above, should return a valid response with the IP matching what was noted earlier when describing the Service.
Summary: The ClusterIP Service is the most commonly used Service within Kubernetes. Every ClusterIP Service is given a cluster unique IP and DNS name that maps to one or more Pod Endpoints. It functions as the main method in which exposed Pod Services are consumed within a Kubernetes Cluster.
Objective: Create a NodePort based Service and explore how it is available both inside and outside the cluster.
manifests/service-nodeport.yaml
apiVersion: v1
kind: Service
metadata:
name: nodeport
spec:
type: NodePort
selector:
app: nginx
environment: prod
ports:
- nodePort: 32410
protocol: TCP
port: 80
targetPort: 80
$ kubectl create -f manifests/service-nodeport.yaml
2. Describe the newly created Service Endpoint. Note the Service still has an internal clusterIP, and now additionally has a NodePort.
$ kubectl describe service nodeport
Name:                     nodeport
Namespace:                default
Labels:                   <none>
Annotations:              <none>
Selector:                 app=nginx
Type:                     NodePort
IP Family Policy:         SingleStack
IP Families:              IPv4
IP:                       10.108.166.87
IPs:                      10.108.166.87
Port:                     <unset>  80/TCP
TargetPort:               80/TCP
NodePort:                 <unset>  32410/TCP
Endpoints:                10.0.1.102:80,10.0.1.136:80,10.0.1.177:80 + 5 more...
Session Affinity:         None

External Traffic Policy:  Cluster
3. kubectl get svc
NAME         TYPE        CLUSTER-IP      EXTERNAL-IP   PORT(S)        AGE
kubernetes   ClusterIP   10.96.0.1       <none>        443/TCP        3d3h
mypod        ClusterIP   10.111.9.205    <none>        80/TCP         2d1h
nodeport     NodePort    10.108.166.87   <none>        80:32410/TCP   6m53s
Note that an IP addres 10.108.166.87 is giev to the service but we dont need this ti access the service. To access the service we can use the ip address of any of the cluster nodes.
4. kubectl get nodes -o wide
~$ kubectl get nodes -o wide
NAME           STATUS   ROLES           AGE    VERSION   INTERNAL-IP      EXTERNAL-IP   OS-IMAGE             KERNEL-VERSION       CONTAINER-RUNTIME

controlplane   Ready    control-plane   3d3h   v1.29.6   192.168.201.10   <none>        Ubuntu 22.04.4 LTS   5.15.0-113-generic   containerd://1.7.12

node01         Ready    <none>          3d3h   v1.29.6   192.168.201.11   <none>        Ubuntu 22.04.4 LTS   5.15.0-113-generic   containerd://1.7.12

node02         Ready    <none>          3d3h   v1.29.6   192.168.201.12   <none>        Ubuntu 22.04.4 LTS   5.15.0-113-generic   containerd://1.7.12
call up your browser with the of one of your worker nodes with the nodeport port like
http://192.168.201.12:32410
5. Lastly, verify that the generated DNS record has been created for the Service by using nslookup within the mypod Pod.
$ kubectl exec mypod -- nslookup nodeport.default.svc.cluster.local
Server: 10.96.0.10
Address: 10.96.0.10:53
It should return a valid response with the IP matching what was noted earlier when describing the Service, as seen above.
Summary: The NodePort Services extend the ClusterIP Service and additionally expose a port that is either statically defined, as above (port 32410) or dynamically taken from a range between 30000-32767. This port is then exposed on every node within the cluster and proxies to the created Service.
Objective: Create a LoadBalancer based Service, and learn how it extends both ClusterIP and NodePort to make a Service available outside the Cluster.
Before you Begin To use Service Type LoadBalancer it requires integration with an external IP provider. In most cases, this is a cloud provider which will likely already be integrated with your cluster.
For bare-metal and on prem deployments, this must be handled yourself. You can use MetalLB https://metallb.universe.tf/installation/
to accomplish this .
If you create a loadbalancer LB without a backend load balancer configured the LB will be in pending state as seen below:
manifests/service-loadbalancer.yaml
apiVersion: v1
kind: Service
metadata:
  labels:
    app: nginx
  name: loadbalancer-svc
spec:
  ports:
  - port: 80
    protocol: TCP
    targetPort: 80
  selector:
    app: nginx
  type: LoadBalancer
Command
$ kubectl create -f manifests/service-loadbalancer.yaml
vagrant@controlplane:~$ k get svc
NAME TYPE CLUSTER-IP EXTERNAL-IP PORT(S) AGE
kubernetes ClusterIP 10.96.0.1 <none> 443/TCP 3d4h
loadbalancer-svc LoadBalancer 10.103.33.247 <pending> 80:31747/TCP 4s
mypod ClusterIP 10.111.9.205 <none> 80/TCP 2d2h
nodeport NodePort 10.108.166.87 <none> 80:32410/TCP 40m
Let's get metalLB deployed using the provided yaml from the MetalLb website:
kubectl apply -f https://raw.githubusercontent.com/metallb/metallb/v0.14.5/config/manifests/metallb-native.yaml
$ kubectl apply -f https://raw.githubusercontent.com/metallb/metallb/v0.14.5/config/manifests/metallb-native.yaml
kubectl get pods -n metallb-system
NAME                          READY   STATUS    RESTARTS       AGE
controller-56bb48dcd4-4t96j   1/1     Running   0              12m
speaker-85jml                 1/1     Running   0              12m
speaker-h77pg                 1/1     Running   4 (2m5s ago)   4m53s
speaker-jcpsd                 1/1     Running   0              12m
In order to assign an IP to the services, MetalLB must be instructed to do so via the IPAddressPool CR.
All the IPs allocated via IPAddressPools contribute to the pool of IPs that MetalLB uses to assign IPs to services.
vim metallb-address-pool.yaml
apiVersion: metallb.io/v1beta1
kind: IPAddressPool
metadata:
  name: first-pool
  namespace: metallb-system
spec:
  addresses:
  - 192.168.1.240-192.168.1.250
kubectl apply -f metallb-address-pool.yaml
After you create the address pool,you can now assign load balancer service type to your pods. Before now, you will not be avble to assign load balancers as they will be in pending state.
manifests/service-loadbalancer.yaml
apiVersion: v1
kind: Service
metadata:
  labels:
    app: nginx
  name: loadbalancer-svc
spec:
  ports:
  - port: 80
    protocol: TCP
    targetPort: 80
  selector:
    app: nginx
  type: LoadBalancer
Command
$ kubectl create -f manifests/service-loadbalancer.yaml
$ kubectl describe service loadbalancer
NAME TYPE CLUSTER-IP EXTERNAL-IP PORT(S) AGE
loadbalancer LoadBalancer 10.105.87.213 10.10.40.201 80:30620/TCP
curl 10.105.87.213
curl 10.10.40.201
$ kubectl exec mypod -- nslookup loadbalancer.dev.svc.cluster.local
It should return a valid response with the IP matching what was noted earlier when describing the Service.
Summary: LoadBalancer Services are the second most frequently used Service within Kubernetes as they are the main method of directing external traffic into the Kubernetes cluster. They work with an external provider to map ingress traffic destined to the LoadBalancer Ingress IP to the cluster nodes on the exposed NodePort. These in turn direct traffic to the desired Pods.
In this lab you'll learn:
We will be working with a freely available microservice called the guestbook. The application is available here:
https://kubernetes.io/docs/tutorials/stateless-application/guestbook/
and
https://github.com/kubernetes/examples/tree/master/guestbook
The following figure depicts the architecture components of the sample guestbook application.
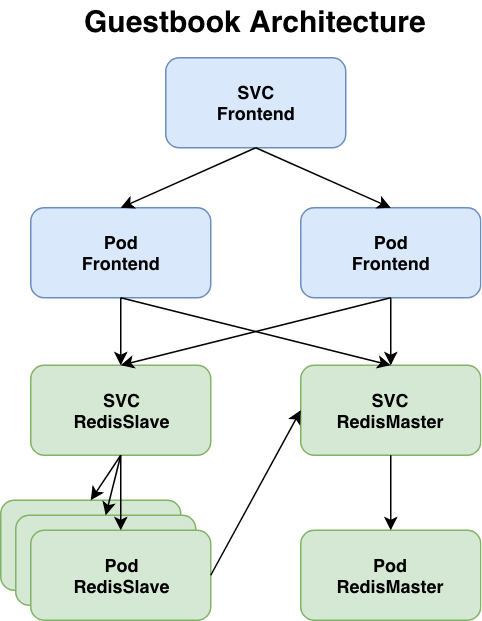
The guestbook application is a Go program which runs inside a container that is deployed to the Kubernetes cluster. It includes a simple HTML page and javascript file for a browser front-end. It uses Redis to store its data. It writes data to a Redis master instance and reads data from multiple Redis slave instances. The master and slave instances also run as containers that are deployed to the Kubernetes cluster.
Let's first use the provided configuration files to deploy the containers and create services for them. We'll then explore the resulting environment.
The guestbook application uses Redis to store its data.
The manifest file, included below, specifies a Deployment controller that runs a single replica Redis Pod.
application/guestbook/redis-leader-deployment.yaml 
# SOURCE: https://cloud.google.com/kubernetes-engine/docs/tutorials/guestbook
apiVersion: apps/v1
kind: Deployment
metadata:
  name: redis-leader
  labels:
    app: redis
    role: leader
    tier: backend
spec:
  replicas: 1
  selector:
    matchLabels:
      app: redis
  template:
    metadata:
      labels:
        app: redis
        role: leader
        tier: backend
    spec:
      containers:
      - name: leader
        image: "docker.io/redis:6.0.5"
        resources:
          requests:
            cpu: 100m
            memory: 100Mi
        ports:
        - containerPort: 6379
Launch a terminal window in the directory you downloaded the manifest files.
Apply the Redis Deployment from the redis-leader-deployment.yaml file:
kubectl apply -f https://k8s.io/examples/application/guestbook/redis-leader-deployment.yaml
Query the list of Pods to verify that the Redis Pod is running:
kubectl get pods
The response should be similar to this:
NAME                           READY   STATUS    RESTARTS   AGE
redis-leader-fb76b4755-xjr2n   1/1     Running   0          13s
Run the following command to view the logs from the Redis leader Pod:
kubectl logs -f deployment/redis-leader
The guestbook application needs to communicate to the Redis to write its data. You need to apply a Service to proxy the traffic to the Redis Pod. A Service defines a policy to access the Pods.
application/guestbook/redis-leader-service.yaml
# SOURCE: https://cloud.google.com/kubernetes-engine/docs/tutorials/guestbook
apiVersion: v1
kind: Service
metadata:
  name: redis-leader
  labels:
    app: redis
    role: leader
    tier: backend
spec:
  ports:
  - port: 6379
    targetPort: 6379
  selector:
    app: redis
    role: leader
    tier: backend
Apply the Redis Service from the following redis-leader-service.yaml file:
kubectl apply -f https://k8s.io/examples/application/guestbook/redis-leader-service.yaml
Query the list of Services to verify that the Redis Service is running:
kubectl get service
The response should be similar to this:
NAME           TYPE        CLUSTER-IP   EXTERNAL-IP   PORT(S)    AGE
kubernetes     ClusterIP   10.0.0.1     <none>        443/TCP    1m
redis-leader   ClusterIP   10.103.78.24 <none>        6379/TCP   16s
This manifest file creates a Service named redis-leader with a set of labels that match the labels previously defined, so the Service routes network traffic to the Redis Pod.
Although the Redis leader is a single Pod, you can make it highly available and meet traffic demands by adding a few Redis followers, or replicas.
application/guestbook/redis-follower-deployment.yaml
# SOURCE: https://cloud.google.com/kubernetes-engine/docs/tutorials/guestbook
apiVersion: apps/v1
kind: Deployment
metadata:
  name: redis-follower
  labels:
    app: redis
    role: follower
    tier: backend
spec:
  replicas: 2
  selector:
    matchLabels:
      app: redis
  template:
    metadata:
      labels:
        app: redis
        role: follower
        tier: backend
    spec:
      containers:
      - name: follower
        image: us-docker.pkg.dev/google-samples/containers/gke/gb-redis-follower:v2
        resources:
          requests:
            cpu: 100m
            memory: 100Mi
        ports:
        - containerPort: 6379
Apply the Redis Deployment from the following redis-follower-deployment.yaml file:
kubectl apply -f https://k8s.io/examples/application/guestbook/redis-follower-deployment.yaml
Verify that the two Redis follower replicas are running by querying the list of Pods:
kubectl get pods
The response should be similar to this:
NAME                             READY   STATUS    RESTARTS   AGE
redis-follower-dddfbdcc9-82sfr   1/1     Running   0          37s
redis-follower-dddfbdcc9-qrt5k   1/1     Running   0          38s
redis-leader-fb76b4755-xjr2n     1/1     Running   0          11m
The guestbook application needs to communicate with the Redis followers to read data. To make the Redis followers discoverable, you must set up another Service.
application/guestbook/redis-follower-service.yaml
# SOURCE: https://cloud.google.com/kubernetes-engine/docs/tutorials/guestbook
apiVersion: v1
kind: Service
metadata:
  name: redis-follower
  labels:
    app: redis
    role: follower
    tier: backend
spec:
  ports:
    # the port that this service should serve on
  - port: 6379
  selector:
    app: redis
    role: follower
    tier: backend
Apply the Redis Service from the following redis-follower-service.yaml file:
kubectl apply -f https://k8s.io/examples/application/guestbook/redis-follower-service.yaml
Query the list of Services to verify that the Redis Service is running:
kubectl get service
The response should be similar to this:
NAME             TYPE        CLUSTER-IP      EXTERNAL-IP   PORT(S)    AGE
kubernetes       ClusterIP   10.96.0.1       <none>        443/TCP    3d19h
redis-follower   ClusterIP   10.110.162.42   <none>        6379/TCP   9s
redis-leader     ClusterIP   10.103.78.24    <none>        6379/TCP   6m10s
This manifest file creates a Service named redis-follower with a set of labels that match the labels previously defined, so the Service routes network traffic to the Redis Pod.
Now that you have the Redis storage of your guestbook up and running, start the guestbook web servers. Like the Redis followers, the frontend is deployed using a Kubernetes Deployment.
The guestbook app uses a PHP frontend. It is configured to communicate with either the Redis follower or leader Services, depending on whether the request is a read or a write. The frontend exposes a JSON interface, and serves a jQuery-Ajax-based UX.
application/guestbook/frontend-deployment.yaml
# SOURCE: https://cloud.google.com/kubernetes-engine/docs/tutorials/guestbook
apiVersion: apps/v1
kind: Deployment
metadata:
  name: frontend
spec:
  replicas: 3
  selector:
    matchLabels:
        app: guestbook
        tier: frontend
  template:
    metadata:
      labels:
        app: guestbook
        tier: frontend
    spec:
      containers:
      - name: php-redis
        image: us-docker.pkg.dev/google-samples/containers/gke/gb-frontend:v5
        env:
        - name: GET_HOSTS_FROM
          value: "dns"
        resources:
          requests:
            cpu: 100m
            memory: 100Mi
        ports:
        - containerPort: 80
Apply the frontend Deployment from the frontend-deployment.yaml file:
kubectl apply -f https://k8s.io/examples/application/guestbook/frontend-deployment.yaml
Query the list of Pods to verify that the three frontend replicas are running:
kubectl get pods -l app=guestbook -l tier=frontend
The response should be similar to this:
NAME                        READY   STATUS    RESTARTS   AGE
frontend-85595f5bf9-5tqhb   1/1     Running   0          47s
frontend-85595f5bf9-qbzwm   1/1     Running   0          47s
frontend-85595f5bf9-zchwc   1/1     Running   0          47s
The Redis Services you applied is only accessible within the Kubernetes cluster because the default type for a Service is ClusterIP. ClusterIP provides a single IP address for the set of Pods the Service is pointing to. This IP address is accessible only within the cluster.
If you want guests to be able to access your guestbook, you must configure the frontend Service to be externally visible, so a client can request the Service from outside the Kubernetes cluster. However a Kubernetes user can use kubectl port-forward to access the service even though it uses a ClusterIP.
Some cloud providers, like Google Compute Engine or Google Kubernetes Engine, support external load balancers. If your cloud provider supports load balancers and you want to use it, uncomment type: LoadBalancer.
application/guestbook/frontend-service.yaml
# SOURCE: https://cloud.google.com/kubernetes-engine/docs/tutorials/guestbook
apiVersion: v1
kind: Service
metadata:
  name: frontend
  labels:
    app: guestbook
    tier: frontend
spec:
  # if your cluster supports it, uncomment the following to automatically create
  # an external load-balanced IP for the frontend service.
  # type: LoadBalancer
  #type: LoadBalancer
  ports:
    # the port that this service should serve on
  - port: 80
  selector:
    app: guestbook
    tier: frontend
Apply the frontend Service from the frontend-service.yaml file:
kubectl apply -f https://k8s.io/examples/application/guestbook/frontend-service.yaml
Query the list of Services to verify that the frontend Service is running:
kubectl get services
The response should be similar to this:
NAME             TYPE        CLUSTER-IP      EXTERNAL-IP   PORT(S)    AGE
frontend         ClusterIP   10.97.28.230    <none>        80/TCP     19s
kubernetes       ClusterIP   10.96.0.1       <none>        443/TCP    3d19h
redis-follower   ClusterIP   10.110.162.42   <none>        6379/TCP   5m48s
redis-leader     ClusterIP   10.103.78.24    <none>        6379/TCP   11m
kubectl port-forwardRun the following command to forward port 8080 on your local machine to port 80 on the service.
kubectl port-forward svc/frontend 8080:80
The response should be similar to this:
Forwarding from 127.0.0.1:8080 -> 80
Forwarding from [::1]:8080 -> 80
load the page http://localhost:8080 in your browser to view your guestbook.
LoadBalancerIf you deployed the frontend-service.yaml manifest with type: LoadBalancer you need to find the IP address to view your Guestbook.
Run the following command to get the IP address for the frontend Service.
kubectl get service frontend
The response should be similar to this:
NAME       TYPE           CLUSTER-IP      EXTERNAL-IP        PORT(S)        AGE
frontend   LoadBalancer   10.51.242.136   109.197.92.229     80:32372/TCP   1m
Copy the external IP address, and load the page in your browser to view your guestbook.
Try adding some guestbook entries by typing in a message, and clicking Submit. The message you typed appears in the frontend. This message indicates that data is successfully added to Redis through the Services you created earlier.
You can scale up or down as needed because your servers are defined as a Service that uses a Deployment controller.
Run the following command to scale up the number of frontend Pods:
kubectl scale deployment frontend --replicas=5
Query the list of Pods to verify the number of frontend Pods running:
kubectl get pods
The response should look similar to this:
NAME                             READY   STATUS    RESTARTS   AGE
frontend-85595f5bf9-5df5m        1/1     Running   0          83s
frontend-85595f5bf9-7zmg5        1/1     Running   0          83s
frontend-85595f5bf9-cpskg        1/1     Running   0          15m
frontend-85595f5bf9-l2l54        1/1     Running   0          14m
frontend-85595f5bf9-l9c8z        1/1     Running   0          14m
redis-follower-dddfbdcc9-82sfr   1/1     Running   0          97m
redis-follower-dddfbdcc9-qrt5k   1/1     Running   0          97m
redis-leader-fb76b4755-xjr2n     1/1     Running   0          108m
Run the following command to scale down the number of frontend Pods:
kubectl scale deployment frontend --replicas=2
Query the list of Pods to verify the number of frontend Pods running:
kubectl get pods
The response should look similar to this:
NAME                             READY   STATUS    RESTARTS   AGE
frontend-85595f5bf9-cpskg        1/1     Running   0          16m
frontend-85595f5bf9-l9c8z        1/1     Running   0          15m
redis-follower-dddfbdcc9-82sfr   1/1     Running   0          98m
redis-follower-dddfbdcc9-qrt5k   1/1     Running   0          98m
redis-leader-fb76b4755-xjr2n     1/1     Running   0          109m
Deleting the Deployments and Services also deletes any running Pods. Use labels to delete multiple resources with one command.
Run the following commands to delete all Pods, Deployments, and Services.
kubectl delete deployment -l app=redis
kubectl delete service -l app=redis
kubectl delete deployment frontend
kubectl delete service frontend
The response should look similar to this:
deployment.apps "redis-follower" deleted
deployment.apps "redis-leader" deleted
deployment.apps "frontend" deleted
service "frontend" deleted
Query the list of Pods to verify that no Pods are running:
kubectl get pods
The response should look similar to this:
No resources found in default namespace.
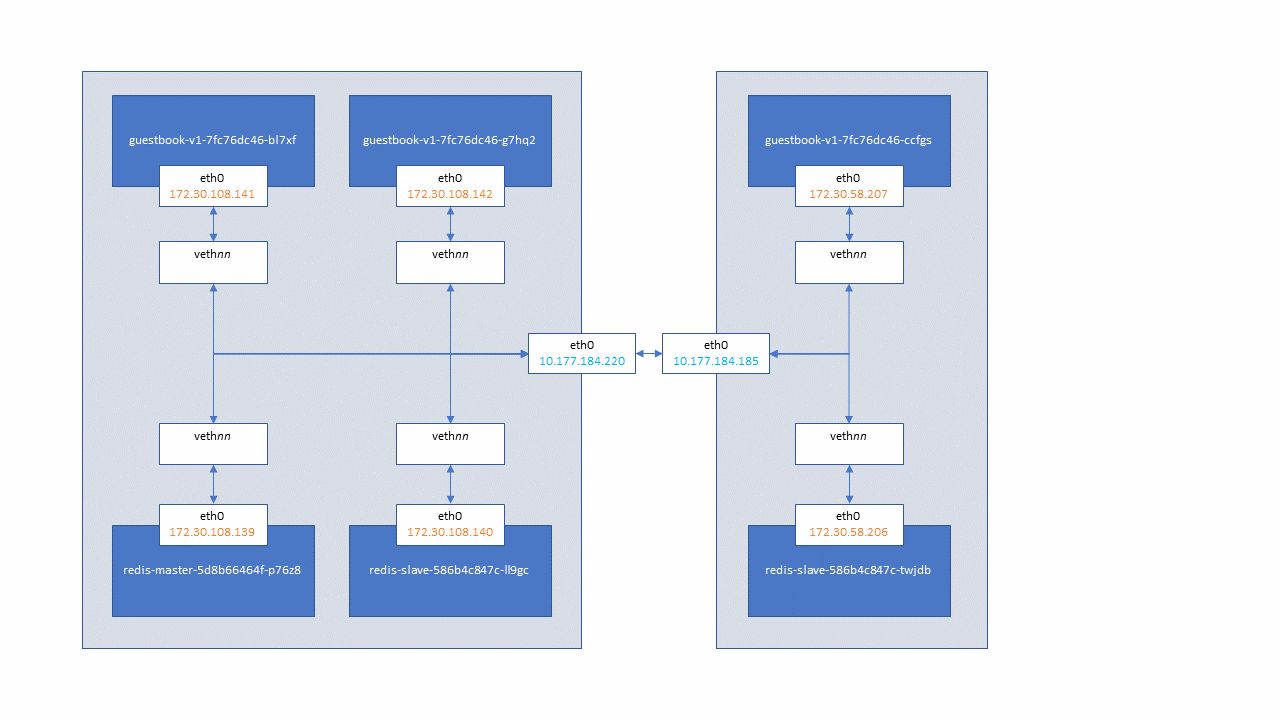
Let's look at the pods and the network that were created. The diagram below illustrates the network configuration of our guestbook deployment. Please note that the pod names will be different from yours.
The guestbook-deployment.yaml file requested 3 replicas. The redis-master-deployment.yaml file requested a single replica. The redis-slave-deployment.yaml file requested 2 replicas. You can view them with this command and take note of the 2 sets of IP addresses (The IP and the Node IP addresses).
$ kubectl get pods -o wide
NAME READY STATUS RESTARTS AGE IP NODE
guestbook-v1-7fc76dc46-bl7xf 1/1 Running 0 2m 172.30.108.141 10.177.184.220
guestbook-v1-7fc76dc46-ccfgs 1/1 Running 0 2m 172.30.58.207 10.177.184.185
guestbook-v1-7fc76dc46-g7hq2 1/1 Running 0 2m 172.30.108.142 10.177.184.220
redis-master-5d8b66464f-p76z8 1/1 Running 0 4m 172.30.108.139 10.177.184.220
redis-slave-586b4c847c-ll9gc 1/1 Running 0 4m 172.30.108.140 10.177.184.220
redis-slave-586b4c847c-twjdb 1/1 Running 0 4m 172.30.58.206 10.177.184.185
There are two networks:
You can observe how the pod network operates over the host node network by running a traceroute command in one of the pods. (Note: The ability to run Linux commands within a container varies depending on the base image it uses. This command will work with guestbook but may not work with other containers
Ensure to first exec into the pod and install traceroute with sudo apt install traceroute -y before running the command below.
$kubectl exec -it guestbook-v1-7fc76dc46-bl7xf -- /bin/bash
#sudo apt update -y
#sudo apt install traceroute -y
#exit
$ kubectl exec -it guestbook-v1-7fc76dc46-bl7xf -- traceroute 172.30.58.206
traceroute to 172.30.58.206 (172.30.58.206), 30 hops max, 46 byte packets
1 10.177.184.220 (10.177.184.220) 0.007 ms 0.005 ms 0.004 ms
2 10.177.184.185 (10.177.184.185) 0.652 ms 0.360 ms 0.510 ms
3 172.30.58.206 (172.30.58.206) 0.591 ms 0.347 ms 0.499 ms
Here we're running a traceroute command on pod guestbook-v1-7fc76dc46-bl7xf which is running on node 10.177.184.220. We ask it to trace the route to another pod, redis-slave-586b4c847c-twjdb which has a pod IP address of 172.30.58.206. We can see the path goes from the first's pod node over to the second pod's node and into the second pod. This is accomplished through the use of virtual ethernet interfaces and updates to Linux routing tables.
One benefit of assigning each pod its own IP address is that applications can use standard ports (80, 443, etc) without the need to remap them at the node level to avoid port conflicts.
Although pods can communicate with each other using their IP addresses, we wouldn't want application programs to use them directly. A pod's IP address can change each time the pod is recreated. If the pod is scaled, then the set of IP addresses to communicate with can be changing frequently.
This is where the ClusterIP services comes in. Let's look at the services we created for the redis master and slaves.
$ kubectl describe service redis-master
Name: redis-master
Namespace: default
Labels: app=redis
role=master
Annotations: <none>
Selector: app=redis,role=master
Type: ClusterIP
IP: 172.21.193.142
Port: <unset> 6379/TCP
TargetPort: redis-server/TCP
Endpoints: 172.30.108.139:6379
Session Affinity: None
Events: <none>
$ kubectl describe service redis-slave
Name: redis-slave
Namespace: default
Labels: app=redis
role=slave
Annotations: <none>
Selector: app=redis,role=slave
Type: ClusterIP
IP: 172.21.60.238
Port: <unset> 6379/TCP
TargetPort: redis-server/TCP
Endpoints: 172.30.108.140:6379,172.30.58.206:6379
Session Affinity: None
Events: <none>
A ClusterIP service provides a stable virtual IP address which distributes TCP connections (or UDP packets) to a targeted set of pods (called endpoints). Here we can see that the redis-master service has the virtual IP address 172.21.193.142 and that it distributes requests to the redis-master's pod IP address172.30.108.139. The redis-slave service has a virtual IP address 172.21.60.238 and it distributes requests to the redis-slave's pod IP addresses 172.30.108.140 and 172.30.58.206.
The method by which Kubernetes implements the virtual IP address varies by Kubernetes release. In the 1.10 release the default method is to use iptables to translate (Network Address Translation) the virtual IP addresses to the pod IP addresses and the choice of pod IP is random.
Kubernetes provides a DNS entry for each service so services can be addressed by name instead of IP address. Let's observe this by doing an nslookup command from within the container. (Note: The ability to run Linux commands within a container varies depending on the base image it uses. This command will work with guestbook but may not work with other containers. You can install the utilities if not installed apt install dnsutils -y)
$ kubectl exec -it guestbook-v1-7fc76dc46-bl7xf -- nslookup redis-master
Server: 172.21.0.10
Address 1: 172.21.0.10 kube-dns.kube-system.svc.cluster.local
Name: redis-master
Address 1: 172.21.193.142 redis-master.default.svc.cluster.local
Here we see that the name redis-master is resolved to address 172.21.193.142 which is the virtual IP address of theredis-master service.
Services are assigned a DNS name of the form <service>.<namespace>.svc.cluster.local. The namespace is needed to address services across namespaces. In this lab we are only using the default namespace so using the service name alone is fine to find services. The domain name svc.cluster.local does not need to be specified inside the pod because Kubernetes sets this in the domain search path in the pod's /etc/resolve.conf file.
C:\>kubectl exec -it guestbook-v1-7fc76dc46-bl7xf -- cat /etc/resolv.conf
nameserver 172.21.0.10
search default.svc.cluster.local svc.cluster.local cluster.local
options ndots:5
The types of IPs presented so far, pod IPs and ClusterIPs, are usable only from within the Kubernetes cluster. It is not possible for applications outside the cluster to use them to reach a pod (without additional configuration, e.g. adding your own routes). For that we need to use a type of service which provides an external IP address. Kubernetes provides two service types which do this.
Let's take a look at the service which we created for the guestbook application (Note this was created on a cluster that can talk to the cloud provider API)
$ kubectl describe service guestbook
Name: guestbook
Namespace: default
Labels: app=guestbook
Annotations: <none>
Selector: app=guestbook
Type: LoadBalancer
IP: 172.21.189.71
LoadBalancer Ingress: 169.46.35.163
Port: <unset> 3000/TCP
TargetPort: http-server/TCP
NodePort: <unset> 30347/TCP
Endpoints: 172.30.108.141:3000,172.30.108.142:3000,172.30.58.207:3000
Session Affinity: None
External Traffic Policy: Cluster
Events:
Type Reason Age From Message
---- ------ ---- ---- -------
Normal EnsuringLoadBalancer 20s service-controller Ensuring load balancer
Normal EnsuredLoadBalancer 20s service-controller Ensured load balancer
This is a LoadBalancer type of service. The services build upon each other so a LoadBalancer service is also a NodePort service and a ClusterIP service. Let's break this down.
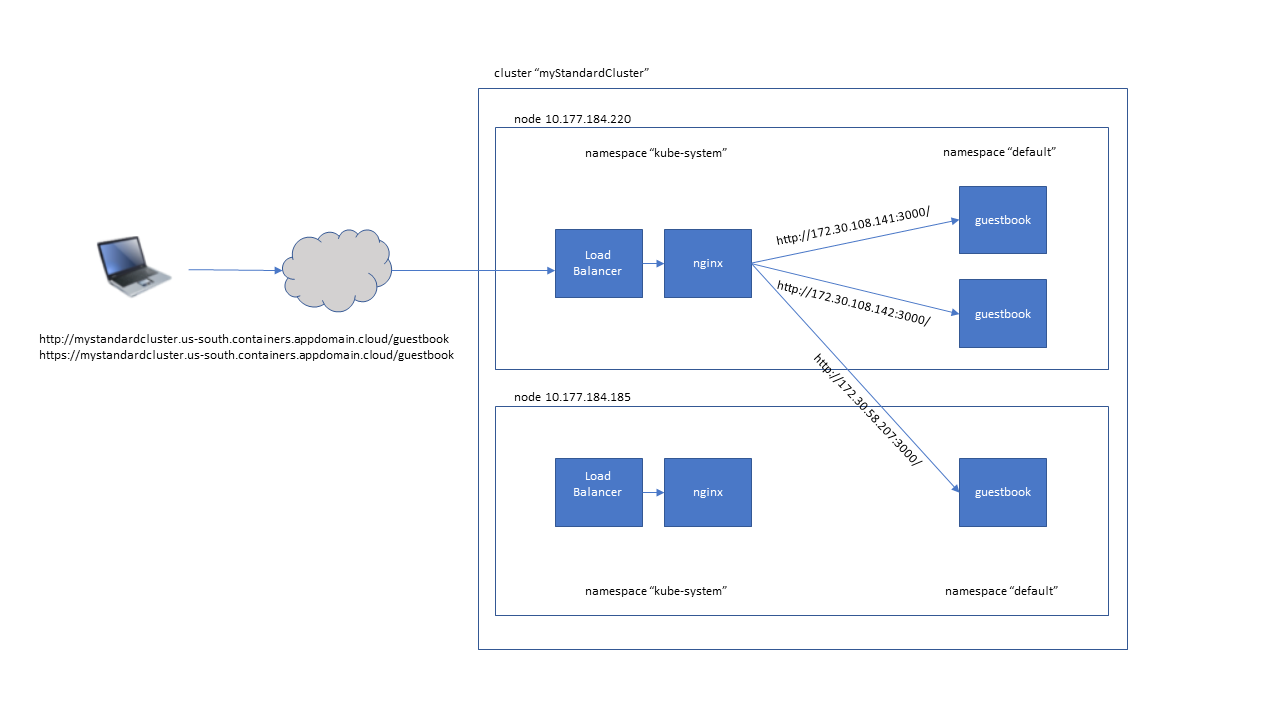
We now have two ways to access the guestbook application from outside the cluster, either through a node's IP address or through the load balancer's IP address. The latter is straightforward: use the loadbalancer address and the port that's configured by the service, which in this case is 3000.
We need to combine the worker node's IP address with the NodePort assigned by Kubernetes which in this example is 30347. The NodePort gives the service a unique endpoint on the node.
http://169.47.252.42:30347
http://169.48.165.242:30347
Note that a NodePort service also distributes TCP connections to the pods. It does not require a pod to be running on the node which you address. If there is a pod running on the node which you address, it is not always the case that a connection will be routed to that pod if there are pods on other nodes as well. The connection might be routed to one of those other pods.
The NodePort service typically would be used only in the following cases:
A Kubernetes LoadBalancer service is a TCP layer (layer 4) load balancer. If you want the features of an application layer (layer 7) load balancer, you need to use an Ingress resource instead of a LoadBalancer service.
The Ingress resource needs to tell the load balancer which services to expose and how to identify which request should be routed to which service. If you have only one service that will be ever be exposed, this is relatively easy: all requests to your ingress subdomain should be routed to that one service. However it's likely that you'll have more than one service. Furthermore most web applications are written to serve files starting at the root path (/) so a way is needed to separate them. The Ingress resource we're using accomplishes this as follows:
This pattern can be repeated as you expose more services to the internet.
Let's change the guestbook application frrom using a LoadBalancer service to using an Ingress resource. First, we will install ingress and test that its working and then we will create ingress for the guestbook application.
They are 2 parts to ingress:
1. The Ingress controller and
2. The ingress servuce
Without an ingress controller you cannot create ingress service so lets deploy the controller.
There are several ingres controllers but here we will use the Nginx controller. We will install using the guides from here:
https://kubernetes.github.io/ingress-nginx/deploy/
Since we already have helm installed, we willl use helm to install ingress conttoller as shown below
helm upgrade --install ingress-nginx ingress-nginx \

  --repo https://kubernetes.github.io/ingress-nginx \

  --namespace ingress-nginx --create-namespace
If you don't have helm install you can use the yaml file
kubectl apply -f https://raw.githubusercontent.com/kubernetes/ingress-nginx/controller-v1.10.1/deploy/static/provider/cloud/deploy.yaml
After installation, you can run these commands to confirm that ingress has been installed:
kubectl get service --namespace ingress-nginx ingress-nginx-controller --output wide --watch
NAME                       TYPE           CLUSTER-IP      EXTERNAL-IP     PORT(S)                      AGE     SELECTOR

ingress-nginx-controller   LoadBalancer   10.109.205.70   192.168.1.241   80:31179/TCP,443:30791/TCP   2m31s   app.kubernetes.io/component=controller,app.kubernetes.io/instance=ingress-nginx,app.kubernetes.io/name=ingress-nginx
Lets' check the namespace:
k get pods -n ingress-nginx
NAME                                        READY   STATUS    RESTARTS   AGE

ingress-nginx-controller-8658cc9b48-wf9dr   1/1     Running   0          3m16s
Now that the controller is installed and all seems good, from the above commands, we can now create ingress services .
VERY IMPORTANT: Please note that ingress requires a service of type Load Balancer. Earlier, we had used metallb to create an external load balancer so we are good but if you don't have metallb deployed, you cannot perform this lab.
Let's once again check the Load balancer IP of the ingress controller
kubectl get service ingress-nginx-controller --namespace=ingress-nginx
NAME                       TYPE           CLUSTER-IP      EXTERNAL-IP     PORT(S)                      AGE

ingress-nginx-controller   LoadBalancer   10.109.205.70   192.168.1.241   80:31179/TCP,443:30791/TCP   76m
Now that we can see that the Ingress controller has an External Load Balancer, IP, let's create a deployment and expose it through a service:
First we create a deployment:
kubectl create deployment demo --image=httpd --port=80
Second, we create a service using expose command
kubectl expose deployment demo
k get svc
NAME               TYPE           CLUSTER-IP       EXTERNAL-IP     PORT(S)        AGE

demo               ClusterIP      10.110.41.147    <none>          80/TCP         11s
Before we create an ingress service to point to the service object, let's test that we can access the service at the clusterIp service IP:
curl 10.110.41.147
<html><body><h1>It works!</h1></body></html>
All is working as expected so we can now use ingress to access the service.
Step 1: Create ingress:
kubectl create ingress demo-localhost --class=nginx \ --rule="demo.localdev.me/*=demo:80"
Step 2: Test the Ingress. We wil use 2 methods to test
method 1 for the Ingress:
kubectl port-forward --namespace=ingress-nginx service/ingress-nginx-controller 8080:80
curl --resolve demo.localdev.me:8080:127.0.0.1 http://demo.localdev.me:8080
<html><body><h1>It works!</h1></body></html>
Test Method 2 for the Ingress. This is an Alternative to the above method:
We can add the hostname to /etc/hosts with the IP address of the ingress controller and that will also give us access. The entry in the /etc/hosts should look like this:
cat /ete/hosts
10.109.205.70 demo.localdev.me
curl demo.localdev.me
<html><body><h1>It works!</h1></body></html>
In Kubernetes, please take note of the following network design by default:
To change the above behavior, you can use Kubernetes network policies to specify how pods can communicate with other pods and with external endpoints. Network policies let you create additional restrictions on what traffic is allowed. For example you may want to restrict external inbound or outbound traffic to certain IP addresses.This feature depends on the CNI in use. Some CNIs don't support network policies so if you configure network policies, they will be ignored. For production environment, it's very important to use a CNI that has network policies.
With network policies, you have to follow these 3 steps:
1.Identify the pods you want to restric trafifc to by using label selectors
2. Specify traffic to allow. Ingress is for traffic towards the pods in step 1 and Egress is traffic from the pods in step 1.
3. Then define the pods/namespaces that can communicate with the pods selected in step 1 and/or that the pods in step 1 can communicate with. When understood, it can be easy to create network policies but very difficult otherwise. You need lots of practice to develop the confidence to create network policies. Only consider creating network policies for production environments if very good at it else it can easily expose your prodcution environment unknowingly.
First we can observe that the redis servers are open to any pod by spinning up a Linux shell inside a pod and making a network connection to the redis servers' IP addresses and ports. We will spin up a busybox container and use a Linux utility called netcat (nc) to communicate with the redis pods and check if the ports are open.
$ kubectl get pods -o wide
NAME READY STATUS RESTARTS AGE IP NODE
guestbook-v1-7fc76dc46-bl7xf 1/1 Running 0 4d 172.30.108.141 10.177.184.220
guestbook-v1-7fc76dc46-ccfgs 1/1 Running 0 4d 172.30.58.207 10.177.184.185
guestbook-v1-7fc76dc46-g7hq2 1/1 Running 0 4d 172.30.108.142 10.177.184.220
redis-master-5d8b66464f-p76z8 1/1 Running 0 4d 172.30.108.139 10.177.184.220
redis-slave-586b4c847c-ll9gc 1/1 Running 0 4d 172.30.108.140 10.177.184.220
redis-slave-586b4c847c-twjdb 1/1 Running 0 4d 172.30.58.206 10.177.184.185
$ kubectl run -i --tty --rm busybox --image=busybox -- sh
If you don't see a command prompt, try pressing enter.
/ # nc -v -z 172.30.108.139 6379
172.30.108.139 (172.30.108.139:6379) open
/ # nc -v -z 172.30.108.140 6379
172.30.108.140 (172.30.108.140:6379) open
/ # nc -v -z 172.30.58.206 6379
172.30.58.206 (172.30.58.206:6379) open
/ # exit
Session ended, resume using 'kubectl attach busybox-5858cc4697-hb6zs -c busybox -i -t' command when the pod is running
deployment.apps "busybox" deleted
In the above exercises:
Now let's define a network policy to restrict access to the redis servers to the guestbook application.
kind: NetworkPolicy
apiVersion: networking.k8s.io/v1
metadata:
  name: redis-policy
spec:
  podSelector:
    matchLabels:
      app: redis
  ingress:
  - from:
    - podSelector:
        matchLabels:
          app: guestbook
$ kubectl create -f networkpolicy.yaml
networkpolicy.networking.k8s.io/redis-policy created
Now that the network policies have been created, we can:
$ kubectl run -i --tty --rm busybox --image=busybox -- sh
If you don't see a command prompt, try pressing enter.
/ # nc -v -z 172.30.108.139 6379
nc: 172.30.108.139 (172.30.108.139:6379): Connection timed out
/ # nc -v -z 172.30.108.140 6379
nc: 172.30.108.140 (172.30.108.140:6379): Connection timed out
/ # nc -v -z 172.30.58.206 6379
nc: 172.30.58.206 (172.30.58.206:6379): Connection timed out
/ # exit
Session ended, resume using 'kubectl attach busybox-5858cc4697-mvgsf -c busybox -i -t' command when the pod is running
deployment.apps "busybox" deleted
We identify the pods to restric traffic to with this:
podSelector:
matchLabels:
app: redis
We then define Ingress policy to allow communication from any pod that has the label app: guestbook
ingress:
- from:
- podSelector:
matchLabels:
app: guestbook
In summary, any pod with he label app: redis in the default namespace will only allow communications from any pod with label app: guestbook
Now you can see how powerful labels can be in Kubernetes. Network policies are very important so we will revisit them at some point in a separate secction.
Pods by themselves are useful, but many workloads require exchanging data between containers, or persisting some form of data.
Kubernetes storages can be broadly divided into local storage (Volumes) and network-attached storage (Persistent Volumes). Local storage is located inside the cluster node where the Kubernetes Pod is running while network attached storage are centralised on the network. Local storages has the advantage of being fast and can be used for things like scratch space but are ephemeral. However, at best a local storage only exists for as long as the pod is alive. Once the pod is deleted the local storage gets deleted as well. For most applications like databases, this is not a desirable feature since preserving the state of the database is important.
In Kubernetes, databases are implemented as StatefulSets. Applications like StatefulSets are dependent on persistent storage and cannot work without them. Creating a persistent volumes requires a storage backend. There are many storage backends you can use in your environment. Some examples include:
All the cloud providers also have their own storage backend.
Here we will deploy OpenEBS and use it for the labs. We use OpenEBS because it is quote easy to deploy even on any cluster.
Lets use this diagram from the Mayadata website to illustrate how Kubernetes storage works:
.png?width=681&name=Storageclass%20blog%20(1).png)
Let us undertand the following:
Objective: Understand how to add and reference volumes to a Pod and their containers.
manifests/volume-example.yaml
apiVersion: v1
kind: Pod
metadata:
name: multi-container-example
labels:
app: nginx
environment: prod
spec:
containers:
- name: nginx
image: nginx:stable-alpine
ports:
- containerPort: 80
volumeMounts:
- name: html
mountPath: /usr/share/nginx/html
readOnly: true
- name: content
image: alpine:latest
volumeMounts:
- name: html
mountPath: /html
command: ["/bin/sh", "-c"]
args:
- while true; do
date >> /html/index.html;
sleep 5;
done
volumes:
- name: html
emptyDir: {}
$ kubectl create -f manifests/volume-example.yaml
Note the relationship between volumes in the Pod spec, and the volumeMounts directive in each container.
$ kubectl exec volume-example -c content -- /bin/sh -c "cat /html/index.html"
You should see a list of date time-stamps. This is generated by the script being used as the entrypoint (args) of the content container.
$ kubectl exec volume-example -c nginx -- /bin/sh -c "cat /usr/share/nginx/html/index.html"
You should see the same file.
$ kubectl exec volume-example -c nginx -- /bin/sh -c "echo nginx >> /usr/share/nginx/html/index.html"
It should error out and complain about the file being read only. The nginx container has no reason to write to the file, and mounts the same Volume as read-only. Writing to the file is handled by the content container.
Here is another emptyDir manifest file:
apiVersion: v1
kind: Pod
metadata:
  name: test-pd
spec:
  containers:
  - image: registry.k8s.io/test-webserver
    name: test-container
    volumeMounts:
    - mountPath: /cache
      name: cache-volume
  volumes:
  - name: cache-volume
    emptyDir:
      sizeLimit: 500Mi
Summary: Pods may have multiple volumes using different Volume types. Those volumes in turn can be mounted to one or more containers within the Pod by adding them to the volumeMounts list. This is done by referencing their name and supplying their mountPath. Additionally, volumes may be mounted both read-write or read-only depending on the application, enabling a variety of use-cases.
Clean Up Command
kubectl delete pod volume-example
HostPath can be used only on one node cluster. Apart from emptyDir{}, it is the second simplest way to quickly create a storage.
kind: PersistentVolume
apiVersion: v1
metadata:
  name: black-pv-cka
  labels:
    type: local
spec:
  capacity:
    storage: 50Mi
  accessModes:
    - ReadWriteOnce
  hostPath:
    path: "/opt/hostpath-pv-cka"
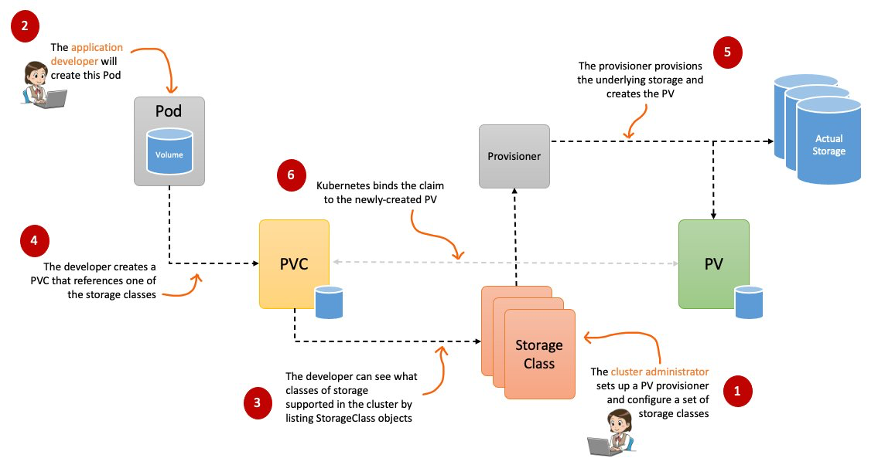
To use a volume in Kubernetes first requires creating a storageclass to connect to a backend storage. For example, to use an OpenEBS storage backend you would create a storage class pointing to OpenEBS, referred to as the provisioner. The manifest file to create the storage class would look like the following:
apiVersion: storage.k8s.io/v1
kind: StorageClass
metadata:
   name: openebs-hostpath
provisioner: openebs.io/local
reclaimPolicy: Delete
volumeBindingMode: WaitForFirstConsumer
Once the storage class has been created, here are the summary of the steps required to connect a Pod to a persistent volume (Refer to the Diagram above).
After the storage class has been created the cluster administrator has the option to provision a persistent volume
In the manual process the Cluster administrator creates volumes of different sizes and make them available for the cluster users (e.g. developers) to use in their applications. One of the problems with this method is that if a user requires a certain volume size which is not already provisioned by the Administrator, the next available storage size will be allocated to the user, leading to waste (e.g if user requests 1G but the next available storage size is 2G, the later will be used)
In dynamic volume creation, when none of the static PVs the administrator created matches a user’s PersistentVolumeClaim, the cluster will try to dynamically provision a volume to meet the request of the PVC provided the administrator has created a StorageClass.
NOTE: A PVC must request a specific storage class except a default is made available. Without a storage class, dynamic provisioning cannot occur.
To enable dynamic storage provisioning based on storage class, the cluster administrator need to enable the DefaultStorageClass admission controller on the API server by passing DefaultStorageClass in a comma-delimited, ordered list of values for the –enable-admission-plugins flag of the API server component.
The syntax of a manual persistent volumes looks like below:
kind: PersistentVolume
apiVersion: v1
metadata:
  name: task-pv-volume
  labels:
    type: local
spec:
  storageClassName: manual
  capacity:
    storage: 1Gi
  accessModes:
    - ReadWriteOnce
A PVC is required to bind to a PV. Pods use PersistentVolumeClaims to request physical storage. A PVC can specify a label selector to further filter the set of volumes. Only the volumes whose labels match the selector can be bound to the claim. Here is an example of a PVC.
kind: PersistentVolumeClaim
apiVersion: v1
metadata:
  name: task-pv-claim
spec:
  storageClassName: manual
  accessModes:
    - ReadWriteOnce
  resources:
    requests:
      storage: 1Gi
The next step is to create a Pod that uses your PersistentVolumeClaim to mount a volume at a specified mount point.
kind: Pod
apiVersion: v1
metadata:
  name: task-pv-pod
spec:
  volumes:
    - name: task-pv-storage
      persistentVolumeClaim:
       claimName: task-pv-claim
  containers:
    - name: task-pv-container
      image: nginx
      ports:
        - containerPort: 80
          name: "http-server"
      volumeMounts:
        - mountPath: "/usr/share/nginx/html"
          name: task-pv-storage
First, lets deploy OpenEBS using helm. You need to install helm if its not already installed. Follow the instructions to deploy helm here:
https://helm.sh/docs/intro/install/
helm repo add openebs https://openebs.github.io/openebs
helm repo update
helm install openebs --namespace openebs openebs/openebs --set engines.replicated.mayastor.enabled=false --create-namespace
helm ls -n openebs

NAME   NAMESPACE REVISION UPDATED                                STATUS  CHART        APP VERSION
openebs openebs  1       2024-07-11 22:15:43.989760708 +0000 UTC deployed openebs-4.1.0 4.1.0
kubectl get pods -n openebs
NAME                                              READY   STATUS    RESTARTS   AGE
openebs-localpv-provisioner-55bf478db6-7tz59      1/1     Running   0          2m44s
openebs-lvm-localpv-controller-668c75f94f-bclkd   5/5     Running   0          2m44s
openebs-lvm-localpv-node-cjqx9                    2/2     Running   0          2m44s
openebs-lvm-localpv-node-jnjmx                    2/2     Running   0          2m44s
openebs-zfs-localpv-controller-65d698cfcc-9px2v   5/5     Running   0          2m44s
openebs-zfs-localpv-node-7pfl8                    2/2     Running   0          2m44s
openebs-zfs-localpv-node-kvlpn                    2/2     Running   0          2m44s
List the storage classes to check if OpenEBS has been installed with default StorageClasses.
kubectl get sc
In the successful installation, you should have the following StorageClasses created:
NAME               PROVISIONER        RECLAIMPOLICY   VOLUMEBINDINGMODE      ALLOWVOLUMEEXPANSION   AGE
openebs-hostpath   openebs.io/local   Delete          WaitForFirstConsumer   false                  3m32s
This section will help you to deploy an application to use the OpenEBS backend just deployed.
The next step is to create a PersistentVolumeClaim. Pods will use PersistentVolumeClaims to request Hostpath Local PV from the OpenEBS Dynamic Local PV provisioner.
Here is the configuration file for the PersistentVolumeClaim. Save the following PersistentVolumeClaim definition as local-hostpath-pvc.yaml
kind: PersistentVolumeClaim
apiVersion: v1
metadata:
  name: local-hostpath-pvc
spec:
  storageClassName: openebs-hostpath
  accessModes:
    - ReadWriteOnce
  resources:
    requests:
      storage: 5G
Create the PersistentVolumeClaim
kubectl apply -f local-hostpath-pvc.yaml
Look at the PersistentVolumeClaim:
kubectl get pvc local-hostpath-pvc
The output shows that the STATUS is Pending. This means PVC has not yet been used by an application pod. The next step is to create a Pod that uses your PersistentVolumeClaim as a volume.
NAME STATUS VOLUME CAPACITY ACCESS MODES STORAGECLASS AGE
local-hostpath-pvc Pending openebs-hostpath 3m7s
Here is the configuration file for the Pod that uses Local PV. Save the following Pod definition to local-hostpath-pod.yaml.
apiVersion: v1
kind: Pod
metadata:
  name: hello-local-hostpath-pod
spec:
  volumes:
  - name: local-storage
    persistentVolumeClaim:
      claimName: local-hostpath-pvc
  containers:
  - name: hello-container
    image: busybox
    command:
       - sh
       - -c
       - 'while true; do echo "`date` [`hostname`] Hello from OpenEBS Local PV." >> /mnt/store/greet.txt; sleep $(($RANDOM % 5 + 300)); done'
    volumeMounts:
    - mountPath: /mnt/store
      name: local-storage
As the Local PV storage classes use waitForFirstConsumer, do not use nodeName in the Pod spec to specify node affinity. If nodeName is used in the Pod spec, then PVC will remain in pending state. See here for more details.
Create the Pod:
kubectl apply -f local-hostpath-pod.yaml
Verify that the container in the Pod is running.
kubectl get pod hello-local-hostpath-pod
Verify that the data is being written to the volume.
kubectl exec hello-local-hostpath-pod -- cat /mnt/store/greet.txt
Verify that the container is using the Local PV Hostpath.
kubectl describe pod hello-local-hostpath-pod
The output shows that the Pod is running on Node: gke-user-helm-default-pool-3a63aff5-1tmf and using the persistent volume provided by local-hostpath-pvc.
Name: hello-local-hostpath-pod
Namespace: default
Priority: 0
Node: gke-user-helm-default-pool-3a63aff5-1tmf/10.128.0.28
Start Time: Thu, 16 Apr 2020 17:56:04 +0000

...

Volumes:

local-storage:

Type: PersistentVolumeClaim (a reference to a PersistentVolumeClaim in the same namespace)

ClaimName: local-hostpath-pvc

ReadOnly: false

...
Look at the PersistentVolumeClaim again to see the details about the dynamically provisioned Local PersistentVolume
kubectl get pvc local-hostpath-pvc
The output shows that the STATUS is Bound. A new Persistent Volume pvc-864a5ac8-dd3f-416b-9f4b-ffd7d285b425 has been created.
NAME STATUS VOLUME CAPACITY ACCESS MODES STORAGECLASS AGE
local-hostpath-pvc Bound pvc-864a5ac8-dd3f-416b-9f4b-ffd7d285b425 5G RWO openebs-hostpath 28m
Look at the PersistentVolume details to see where the data is stored. Replace the PVC name with the one that was displayed in the previous step.
kubectl get pv pvc-864a5ac8-dd3f-416b-9f4b-ffd7d285b425 -o yaml
The output shows that the PV was provisioned in response to PVC request spec.claimRef.name: local-hostpath-pvc.
apiVersion: v1
kind: PersistentVolume
metadata:
name: pvc-864a5ac8-dd3f-416b-9f4b-ffd7d285b425
annotations:
pv.kubernetes.io/provisioned-by: openebs.io/local
...
spec:
accessModes:
- ReadWriteOnce
capacity:
storage: 5G
claimRef:
apiVersion: v1
kind: PersistentVolumeClaim
name: local-hostpath-pvc
namespace: default
...
We have 2 files to use to deploy wordpress and mysql. Each file contais a Deployment, Service and PVC object. One of them is mysql.yaml and the other one is wordpress.yaml.
You may want to change the WordPress service type LoadBalancer to NodePort, if you dont have metallb deployed and you don't have any other backend to serve out loadbalancer IPs. To do that, edit WordPress.yaml file and change the service type from
type: LoadBalancer to type: NodePort
Here is wordpress.yaml
apiVersion: v1
kind: Service
metadata:
  name: wordpress
  labels:
    app: wordpress
spec:
  ports:
    - port: 80
  selector:
    app: wordpress
    tier: frontend
  type: LoadBalancer

---
apiVersion: v1
kind: PersistentVolumeClaim
metadata:
  name: wp-pv-claim
  labels:
    app: wordpress
spec:
  storageClassName: openebs-hostpath
  accessModes:
    - ReadWriteOnce
  resources:
    requests:
      storage: 20Gi

---
apiVersion: apps/v1
kind: Deployment
metadata:
  name: wordpress
  labels:
    app: wordpress
    tier: frontend
spec:
  selector:
    matchLabels:
      app: wordpress
      tier: frontend
  strategy:
    type: Recreate
  template:
    metadata:
      labels:
        app: wordpress
        tier: frontend
    spec:
      containers:
        - image: wordpress:4.6.1-apache
          name: wordpress
          env:
            - name: WORDPRESS_DB_HOST
              value: wordpress-mysql
            - name: WORDPRESS_DB_PASSWORD
              value: changeme
          ports:
            - containerPort: 80
              name: wordpress
          volumeMounts:
            - name: wordpress-persistent-storage
              mountPath: /var/www/html
      volumes:
        - name: wordpress-persistent-storage
          persistentVolumeClaim:
            claimName: wp-pv-claim
Here is the file for mysql.yaml
apiVersion: v1
kind: Service
metadata:
  name: wordpress-mysql
  labels:
    app: wordpress
spec:
  ports:
    - port: 3306
  selector:
    app: wordpress
    tier: mysql
  clusterIP: None
---
apiVersion: v1
kind: PersistentVolumeClaim
metadata:
  name: mysql-wordpress-pv-claim
  labels:
    app: wordpress
spec:
  storageClassName: openebs-hostpath
  accessModes:
    - ReadWriteOnce
  resources:
    requests:
      storage: 20Gi
---
apiVersion: apps/v1
kind: Deployment
metadata:
  name: wordpress-mysql
  labels:
    app: wordpress
    tier: mysql
spec:
  selector:
    matchLabels:
      app: wordpress
      tier: mysql
  strategy:
    type: Recreate
  template:
    metadata:
      labels:
        app: wordpress
        tier: mysql
    spec:
      containers:
        - image: mysql:5.6
          name: mysql
          env:
            - name: MYSQL_ROOT_PASSWORD
              value: changeme
          ports:
            - containerPort: 3306
              name: mysql
          volumeMounts:
            - name: mysql-persistent-storage
              mountPath: /var/lib/mysql
      volumes:
        - name: mysql-persistent-storage
          persistentVolumeClaim:
            claimName: mysql-wordpress-pv-claim
Let us create them. Its' better to create mysql.yaml first since Wordpress depends on the database.
kubectl create -f mysql.yaml

service/wordpress-mysql created
persistentvolumeclaim/mysql-wordpress-pv-claim created
deployment.apps/wordpress-mysql created
kubectl create -f wordpress.yaml

service/wordpress created
persistentvolumeclaim/wp-pv-claim created
deployment.apps/wordpress created
Kubectl get pods

wordpress-658d46dddd-rf74j               1/1     Running   4 (15m ago)   18m
wordpress-mysql-bd686767f-jslsr          1/1     Running   0             16m
kubectl get pv
pvc-0a1ddbee-20d7-4bde-a192-4ec200604d60   20Gi       RWO            Delete           Bound      default/mysql-wordpress-pv-claim   openebs-hostpath   <unset>

pvc-b619d6c5-33d3-433b-8ae2-03fa9d5b15fc   20Gi       RWO            Delete           Bound      default/wp-pv-claim                openebs-hostpath   <unset>
kubectl get pvc

mysql-wordpress-pv-claim   Bound    pvc-0a1ddbee-20d7-4bde-a192-4ec200604d60   20Gi       RWO            openebs-hostpath   <unset>                 18m

wp-pv-claim                Bound    pvc-b619d6c5-33d3-433b-8ae2-03fa9d5b15fc   20Gi       RWO            openebs-hostpath   <unset>                 21m
kubectl get svc

wordpress               LoadBalancer   10.104.146.12    192.168.1.12   80:31872/TCP     22m
wordpress-mysql         ClusterIP      None             <none>         3306/TCP         19m
Now that WordPress and mysql have been deployed, let us attempt to configure WordPress. Since we run the service as a Loadbalancer we can access WordPress with 10.104.146.12 as we can see the IP above. If you used NodePort, you need to replace the IP with the IP address of one of the cluster nodes (can be any worker node) and the NodePort ( for example 31872) assigned to the WordPress service.
Put the IP of the Loadbalancer in your browser and the wordpress page will appear for you to configure.
http://192.168.1.12
To use the NodePort, let us use the IP of one of the cluster nodes. You can use this command to obtain the IP of one of the cluster nodes:
kubectl get nodes -o wide
http://192.168.1.192:31872
NOTE: Accessing your services requyires that you undertsand Kubernetes Service Objects discussed under newtworking. Your K8S cluster setup will determine how you access your services and in fact this requires that you understand networking concepts.
The Kubernetes scheduler assigns pods to nodes as needed, but sometimes you may want to influence how the scheduler does that. For some example, you may want to assign certain pods to certain nodes, maybe because those pods can function better on those nodes. For example, if a cluster node has SSDs and a particular application (say databases) may function better using SSD syou may want those pods schedules on those nodes. There are 2 main categorizations for doing this:
1. Labels on the nodes - Here, you assign labels to the nodes, and then you tell the scheduler to assign pods to those nodes using Label selector attributes such as:
2. You can reserve some cluster nodes with a feature called Taint. When a node has taint on it, no Pod will be scheduled on it except you apply a Toleration on the pod. Hence, Taint and Toleration can be used to direct pods to reserved cluster nodes.
In summary, you can either use Labels and Label selectors or Taint and Toleration to control advanced scheduling in Kubernetes. By advanced, I mean the ability to avoid the default scheduler behavior and do things your won way.
This is the simplest, recommended form of assigning a pod to a node. You can add the nodeSelector field to your Pod specification and specify the labels on the target node. Below is an example.
Step 1: Select a node to which you want to add a label
For example, let’s say we want to add a new label with the key “disktype” and value “ssd” to the “host02” node, which is a node with the SSD storage. To do so, run:
$kubectl get nodes –show-labels
You can also view the tags by describing the host as below:
$kubectl describe node "host02"
$kubectl label nodes host02 disktype=ssd
Step 2: Save the following to nodeselector.yaml and create it
apiVersion: v1
kind: Pod
metadata:
  name: nginx
  labels:
    env: test
spec:
  containers:
  - name: nginx
    image: nginx
    imagePullPolicy: IfNotPresent
  nodeSelector:
    disktype: ssd
Kubectl get pods -o wide
Here we can see that the pod is running in the node that was labelled. If there is no node with the label, the pod will go into ‘pending’ state.
This also uses labels on the Pod or Node. You can either use existing labels added by Kubernetes, or you can add your own labels. The difference between this method and NodeSelector is that you have more options in how to control the scheduling behavior. Here are some of the things you can do:
requiredDuringSchedulingIgnoredDuringExecution: The scheduler can't schedule the Pod unless the rule is met. This functions like nodeSelector, but with a more expressive syntax.preferredDuringSchedulingIgnoredDuringExecution: The scheduler tries to find a node that meets the rule. If a matching node is not available, the scheduler still schedules the Pod.
apiVersion: v1
kind: Pod
metadata:
  name: with-node-affinity
spec:
  affinity:
    nodeAffinity:
      requiredDuringSchedulingIgnoredDuringExecution:
        nodeSelectorTerms:
        - matchExpressions:
          - key: topology.kubernetes.io/zone
            operator: In
            values:
            - antarctica-east1
            - antarctica-west1
      preferredDuringSchedulingIgnoredDuringExecution:
      - weight: 1
        preference:
          matchExpressions:
          - key: another-node-label-key
            operator: In
            values:
            - another-node-label-value
  containers:
  - name: with-node-affinity
    image: registry.k8s.io/pause:2.0
apiVersion: v1
kind: Pod
metadata:
  name: with-pod-affinity
spec:
  affinity:
    podAffinity:
      requiredDuringSchedulingIgnoredDuringExecution:
      - labelSelector:
          matchExpressions:
          - key: security
            operator: In
            values:
            - S1
        topologyKey: topology.kubernetes.io/zone
    podAntiAffinity:
      preferredDuringSchedulingIgnoredDuringExecution:
      - weight: 100
        podAffinityTerm:
          labelSelector:
            matchExpressions:
            - key: security
              operator: In
              values:
              - S2
          topologyKey: topology.kubernetes.io/zone
  containers:
  - name: with-pod-affinity
    image: registry.k8s.io/pause:2.0
In the following example Deployment for the Redis cache, the replicas get the label app=store. The podAntiAffinity rule tells the scheduler to avoid placing multiple replicas with the app=store label on a single node. This creates each cache in a separate node.
apiVersion: apps/v1
kind: Deployment
metadata:
  name: redis-cache
spec:
  selector:
    matchLabels:
      app: store
  replicas: 3
  template:
    metadata:
      labels:
        app: store
    spec:
      affinity:
        podAntiAffinity:
          requiredDuringSchedulingIgnoredDuringExecution:
          - labelSelector:
              matchExpressions:
              - key: app
                operator: In
                values:
                - store
            topologyKey: "kubernetes.io/hostname"
      containers:
      - name: redis-server
        image: redis:3.2-alpine
The following example Deployment for the web servers creates replicas with the label app=web-store. The Pod affinity rule tells the scheduler to place each replica on a node that has a Pod with the label app=store. The Pod anti-affinity rule tells the scheduler never to place multiple app=web-store servers on a single node.
apiVersion: apps/v1
kind: Deployment
metadata:
  name: web-server
spec:
  selector:
    matchLabels:
      app: web-store
  replicas: 3
  template:
    metadata:
      labels:
        app: web-store
    spec:
      affinity:
        podAntiAffinity:
          requiredDuringSchedulingIgnoredDuringExecution:
          - labelSelector:
              matchExpressions:
              - key: app
                operator: In
                values:
                - web-store
            topologyKey: "kubernetes.io/hostname"
        podAffinity:
          requiredDuringSchedulingIgnoredDuringExecution:
          - labelSelector:
              matchExpressions:
              - key: app
                operator: In
                values:
                - store
            topologyKey: "kubernetes.io/hostname"
      containers:
      - name: web-app
        image: nginx:1.16-alpine
nodeName is a more direct form of node selection than affinity or nodeSelector. nodeName is a field in the Pod spec. If the nodeName field is not empty, the scheduler ignores the Pod and the kubelet on the named node tries to place the Pod on that node.
Using nodeName overrules using nodeSelector or affinity and anti-affinity rules.
Some of the limitations of using nodeName to select nodes are:
Here is an example:
apiVersion: v1
kind: Pod
metadata:
  name: nginx
spec:
  containers:
  - name: nginx
    image: nginx
  nodeName: kube-01
kubectl taint nodes node1 key1=value1:NoSchedule
The taint has key key1, value value1, and taint effect NoSchedule. This means that no pod will be able to schedule onto node1 unless it has a matching toleration.
To remove the taint added by the command above, you can run:
kubectl taint nodes node1 key1=value1:NoSchedule-
Here is how you specify the toleration in a pod:
You specify a toleration for a pod in the PodSpec. Both of the following tolerations "match" the taint created by the kubectl taint line above, and thus a pod with either toleration would be able to schedule onto node1:
tolerations:
- key: "key1"
  operator: "Equal"
  value: "value1"
  effect: "NoSchedule"
Here is an example of a pod that accepts the toleration:
apiVersion: v1
kind: Pod
metadata:
  name: nginx
  labels:
    env: test
spec:
  containers:
  - name: nginx
    image: nginx
    imagePullPolicy: IfNotPresent
  tolerations:
  - key: "example-key"
    operator: "Exists"
    effect: "NoSchedule"
The above example used the effect of NoSchedule.
The allowed values for the effect field are:
NoExecute
This affects pods that are already running on the node as follows:
tolerationSeconds in their toleration specification remain bound forevertolerationSeconds remain bound for the specified amount of time. After that time elapses, the node lifecycle controller evicts the Pods from the node.NoSchedule
No new Pods will be scheduled on the tainted node unless they have a matching toleration. Pods currently running on the node are not evicted.
PreferNoSchedule
PreferNoSchedule is a "preference" or "soft" version of NoSchedule. The control plane will try to avoid placing a Pod that does not tolerate the taint on the node, but it is not guaranteed.